Pre-requisite: configuration of at least a box office type Sales Channel (and point of sales with linked Workstation and Payment Methods), Operators (with sales Profile), and Season's products correctly configured (with proper Activity Profile or Product Profile).
Aim: understanding the most important features of the main sales screen in S360 in order to sell products.
General overview
Sales-Reservation screen is the main and most complete sales screen in S360.
It allows to sell all product families, to contacts as well as anonymous users, to set/change reservations, with full control on ticket delivery options, documents to be sent and payments methods (according to initial configuration).
More specialized sales screens are:
- Sales | Sales | Calendar → specific for selling visit passes and for planning
- Sales | Quick Sales | With map → dedicated to events with seatmap (with less features, no reservation, etc.)
- Sales | Quick Sales | Without map → specific to only events without seatmap (with less features, no reservation, etc.)
- Sales | Quick Sales | Touch → special "save-queue" screen optimized for touch screens; available only for a sub-set of product families of the day (or the following one), merchandising, and limited features to boost operational speed
Screen main sections
The screen has many features that can be divided in 10 blocks. Click on the section names below you if you're looking for specif help on one of them.
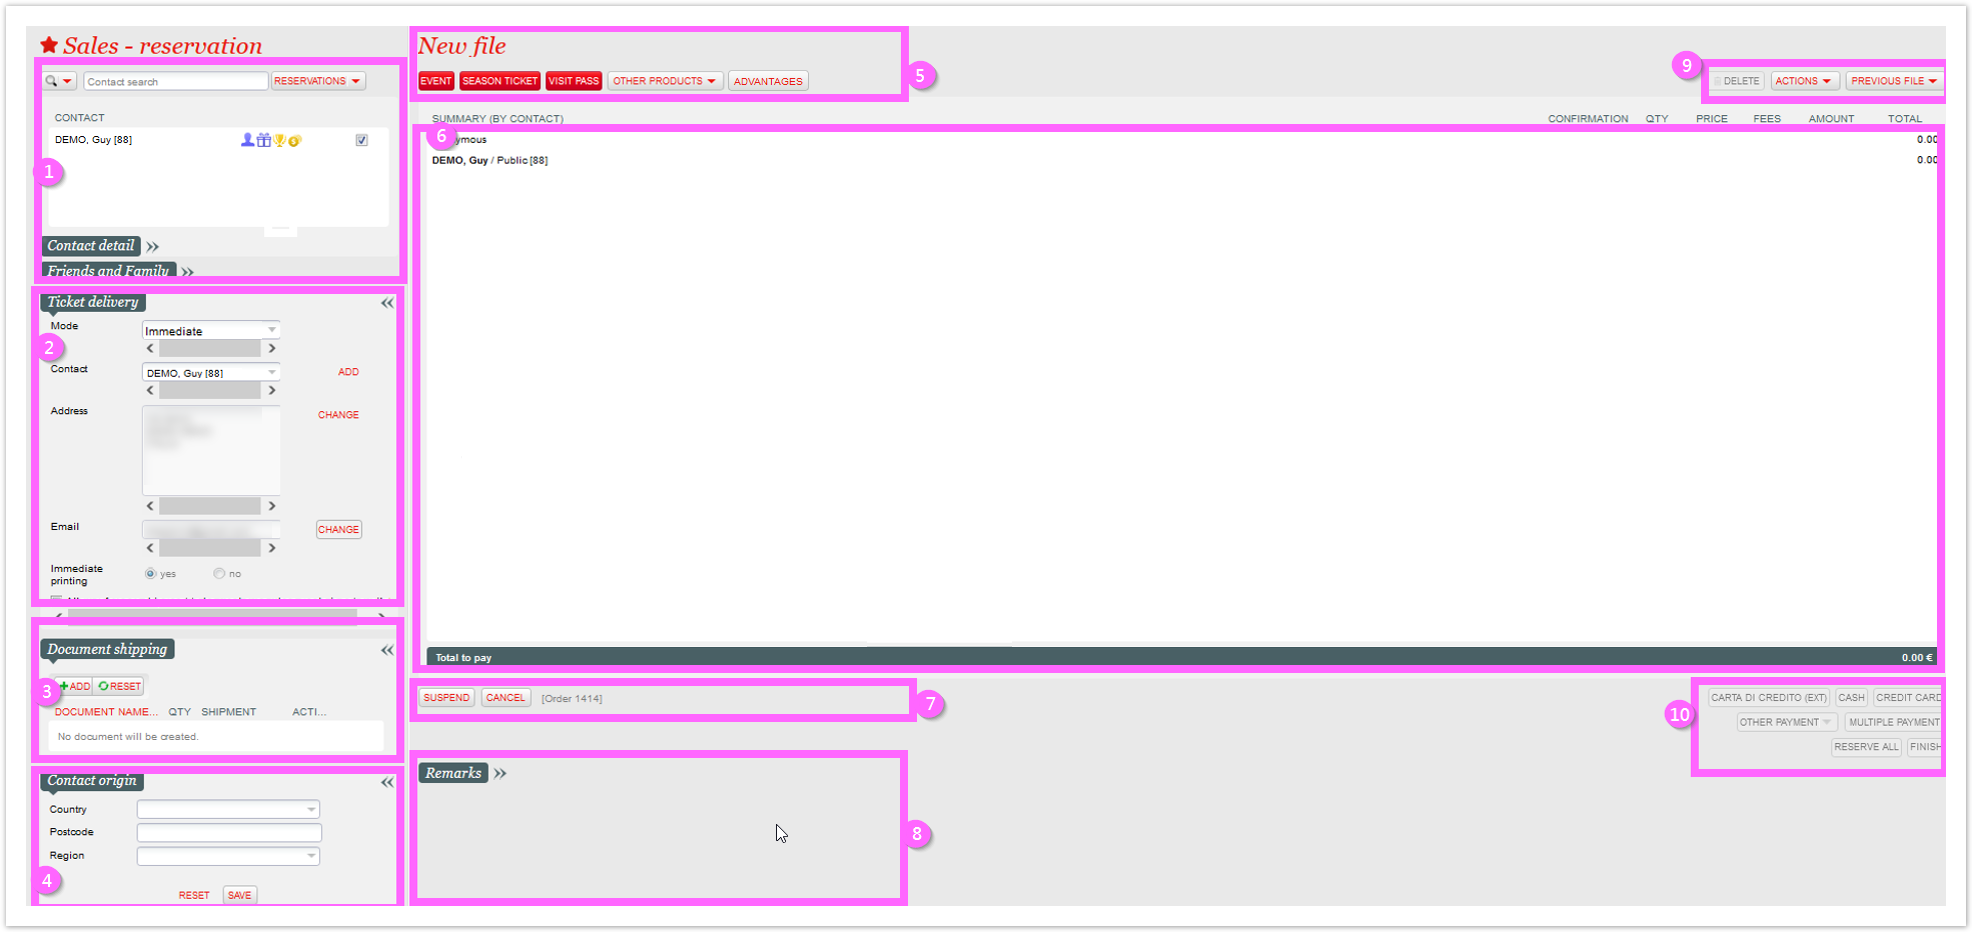
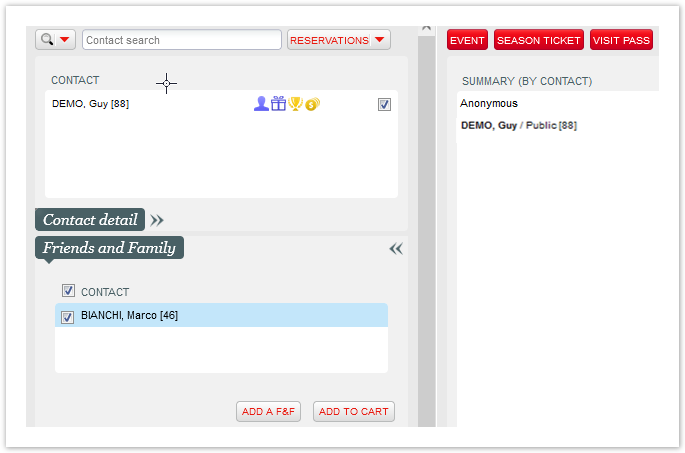
Contact
This section includes three sub-sections: Search and selection, Contact details, Friends and Family
SEARCH AND SELECTION
The first sub-section will allow you to look for contact, create a new one, and also search for reservation/season tickets
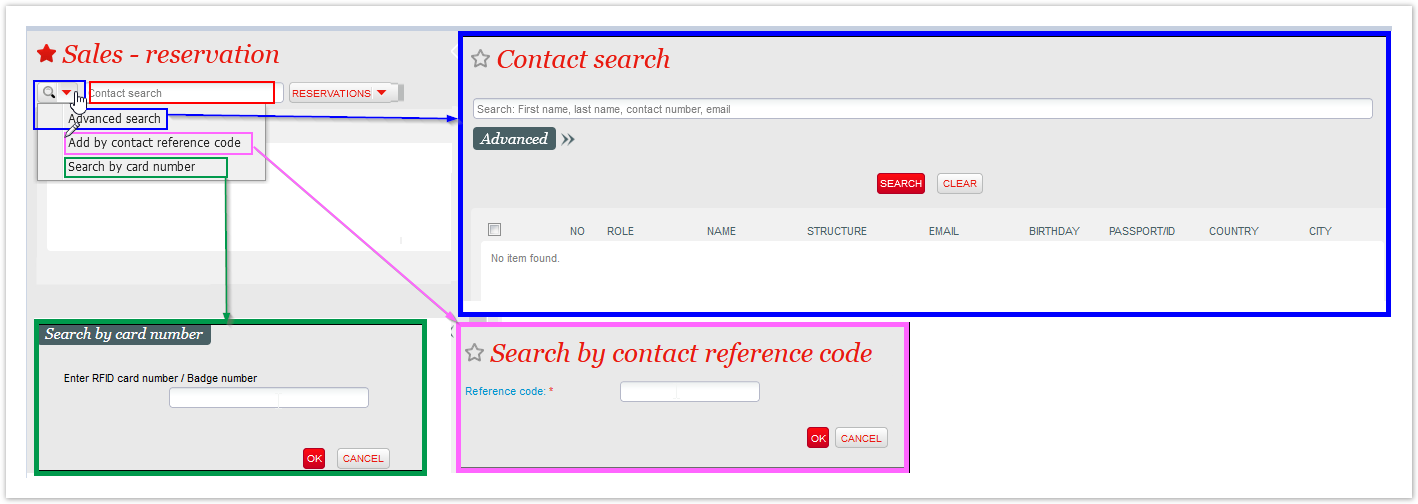
Search. The are four ways:
- Contact search: by typing at least 3 digits, or a whole email address, or the contact number (then press return). If your contact search does not produce any result, you can create a new contact. Please see How to create a contact file or Organization | Contacts
- Magnifier icon/Advanced search: it will open the main contact search screen. Here more info on how to find a contact.
- By reference code: if reference code is set at contact level
- By card: it might be season ticket code, RFID, etc.
You can have more contacts. The one with the checkbox ticked will be the File Contact (or main contact). You can set only one File contact.

Contacts may display several icons that will help you understand what type of the contacts they are, loyalty indications, and other possibilities they have in terms of payment, promotions etc. Please see more explanations here: Contact symbols
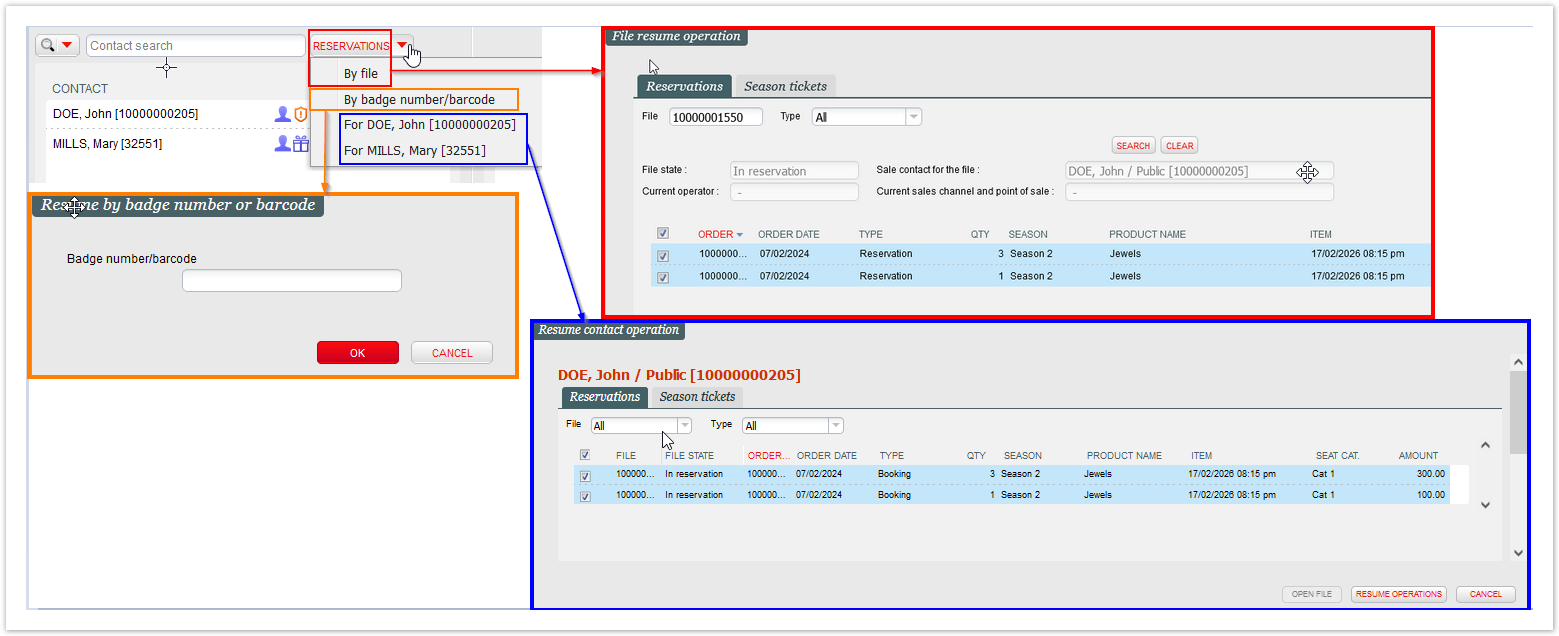
The button  will allow other ways to search and resume orders:
- Reservation button/By File: both the main "reservation" button and the first mode of the drop-down list will allow you to search, by file, for reservations, options ans season tickets
- By badge number/barcode: you can search by card/season ticket code also by reading a barcode with a desktop optical reader
- For [Contact]: by choosing one contact at once you can find existing reservations and season tickets. As well as you input a contact in the contact search, this window will automatically popup in case of pending reservations
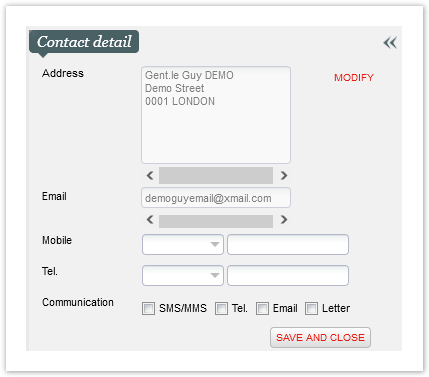
CONTACT DETAILS
If the previous Contact box is populated already with a File Contact, the related information will be used to populate these fields.
Address, email and phone numbers can be updated and changed on the fly according to operator privileges, as well as communication means.
FRIEND AND FAMILY
This section will automatically open in case the input contact on previous box have parent or children contacts configured.
You can add a new friend/family contact if needed and also move it to the cart easily.
More info and Friends and family here and here.
Ticket delivery
If the previous Contact box is populated already with a File Contact, the same one will be automatically used for Contact fields:
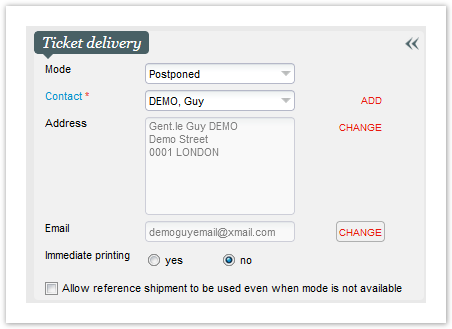
Mode drop-down menu will display the shipping options available for tickets as well as they are configured in Shipments modes and at product level.
Please note that some shipment modes will require a contact in order to finalize the order, among them: post, electronic/e-ticket, postpone, etc.
Electronic and print@home will also require the contact to have email address and the password properly set on the ticketshop in order to actually collect the tickets on the personal area.
Italian Certification | Specific behaviour
![]() Italian clients using a Certified S-360 license cannot select a shipment mode at product level and will also need to use a tracked payment method (i.e., no cash) to issue ticket electronically.
Italian clients using a Certified S-360 license cannot select a shipment mode at product level and will also need to use a tracked payment method (i.e., no cash) to issue ticket electronically. ![]()
Address and Email fields will automatically get the information present at contact level (if any, and if a contact is indicated above). They can be updated and changed on the fly according to operator privileges.
Immediate printing option will allow you to define if tickets will be printed as well as the order is paid. However according to the delivery mode this option might be fixed by default.
Please see more info here about the feature Allow reference shipment to be used even when mode is not available
Document shipping
In this section the operators will be able to overview the documents that will be printed or digitally sent to the file contact (if any and if with email address) as well as the order is completed.
Documents are automatically shown if configured in Document to send (organization context). They can be temporarily removed, if the specif order does not require them, by clicking![]() .
.
Reset button will revert the selection to what originally set by configuration, while Add button will allow to insert a new one from a given set.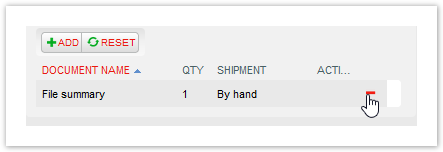
Contact origin
This section allows to indicate the geographical origin of your customers even if they are anonymous (so when no contact is selected in the previous sections).
This could be interesting for further analysis or reports of your sales, yet though no contact is linked to them.

File and Product/Advantage selection
On the top of this screen, in case of new file - as well as an item is added in the cart - you'll see the File number. This unique number will be automatically assigned by the system.
You will also see it when resuming an existing file and, since it's possible to resume multiple files at once, you may see either something like
![]() or
or 
Just below the File number, the set of product families' buttons allows to start the sometimes standard (services, open pass, etc.) or sometimes specific (events, visit passes, etc), sales process.
In order to proceed with memberships or season tickets however a contact must always be selected first.
According to the license you might also not have access to some product families/buttons. Their order is provided by default according to the vertical of your organization, with three independent main families, and the rest included in "other products" drop-down menu.![]()
The last  button - available if advantages are configured - will work as a shortcut to select and sell advantages easily (contact, public and also partner types, if the code is provided)
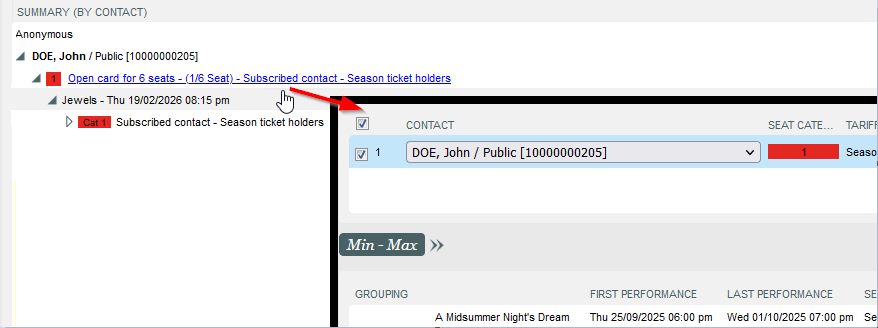
Summary (Cart)
This section will include all cultural contacts and products you will use and select while working on the file/order.
It may get really articulated then according to how complex and multi-product your selection is. Please see some general information below:

| 1 | Cultural contacts | Unless you sell items to anonymous users, cultural contacts will be displayed as SURNAME, Name / Role [Contact Number]. You can drag-and-drop an item from a cultural contact to one another simply holding left-click on the item and moving it to the desired contact (restrictions apply, for instance if product requires a contact type different from occasional). When dragging a product with more items you will be able to select how many have to be moved.
In this section you may also decide to assign products only to cultural contacts but not the File Contact. |
| 2 | Products | When selected, products populate the whole summary section. According to product specificity you may see additional shortcuts.
If you're resuming reservations you may see the confirmation dates: |
| 3 | Selection details | This section includes information regarding contingents, tariffs, seat categories (if any), seat details (if any). Moreover the circle icons on the left indicate the status of each single ticket/item.
|
| 4 | Quantities and amounts | On the right of the screen you have all subtotals. For simple and not seated products you can directly input a different quantity from the dedicated boxes: |
| 5 | Other | In this section there may be other advanced or geo-specific features, like Cancellation insurance, or pre-paid VAT (certified Italian clients only) |


Suspend / Cancel
Suspend button allows the operators to "freeze" an ongoing order. Be aware that, until they are resumed and closed, suspend files will keep items and selected seats indefinitely, so with a potential critical impact on your availability.
If operators are allowed, suspended files can then be retraced and resumed in the dedicated menu:

A pending file alert popup will be displayed at every login in the sales context in case you have some.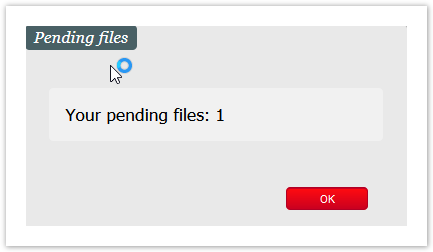
Cancel button will free any new potential selection in the cart.
If you are working in a new file/order, when cancelling you'll lose all selected item and the order will be discarded (as empty).
However, if you're are resuming an existing reservation order, when cancelling you'll only lose any potential modification or addition in your new order, while all items/seats in the original order will be kept as they were.
Remarks
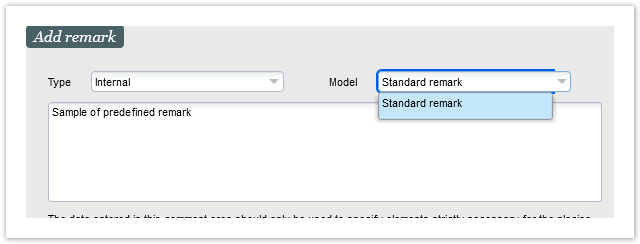
When you have at least one product in the cart, before proceeding with paying/reserving the order, you can add a remark:

Remarks can be labelled with one of the following types: 1) Contact, 2) Internal, 3) External

If set, it is possible to recall existing Predefined Remarks:
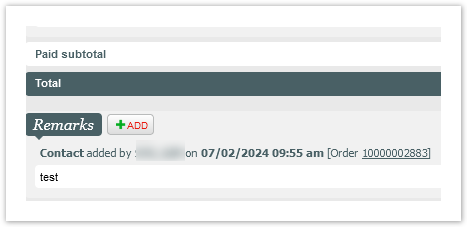
Remarks can then be found at the bottom of the related File Detail screen:
Actions
Delete button will remove the selected lines from the temporary cart.
Actions menu includes:
- Change tariff → to modify the tariff of the select line (must be a tariff/item line, not product or contact line)
- Enter promotional code → to apply a predefined promotional code
- Discount one item → for goods only; available when selecting in item line with quantity > 1. Discount threshold must be defined at product level.
- Discount all items → for goods only. Discount threshold must be defined at product level.
- Change the commission rate → available if contract commissions are configured
- Drop item from cart → same as pressing

- Modify contingent → available if allowed by configuration/product
- Lock reservation/option → to lock reservations from mass releases set in Follow up options/reservations screen
- Unlock reservation/option → to unlock reservations previously locked
- Edit visit → (not used anymore)
- Change file contacts → available unless the file is running or has been suspended or if its has only 1 order
- Ticket holders → allows to specify different beneficiaries (just names/surname, not real contacts) to each ticket, or use cultural contacts names.

- Expand the whole file → shortcut to view all the sub-lines of the cart (rather than manually use

 icons.
 - Change the valid from date of memberships → available if allowed at product level
Previous file menu will allow you to view the last file you worked on and, in case an Epson printer is set, you can reprint the receipt (mainly for merchandising items - geo limitations may apply).
Payment and Reservation
This section will display the methods available for payments configured in payment methods and allowed for the specific point of sales (and at product level).
The first three methods set at point of sales level will have a dedicated button, while all the others will be grouped in "Other payment" button.
Reserve all button will be enabled as well as a File Contact is defined for the order, while the button Finish will be enabled when issuing free item/tickets or when removing items from existing reservation.