Pre-requisite: create Activities, Teams, Competition types, Logical Configuration, Rates Table, Sales Calendar
Aim: create the matches you will sell
Description:
The following buttons perform actions at Competition level, i.e. for all the matches included.
New
| Delete
| Validate
| Run
| Suspend
| Cancel
| Close
| Duplicate
| Copy from season or activity
| Performances
| Print test ticket
| Export to Excel
|
|---|---|---|---|---|---|---|---|---|---|---|---|
| Delete an existing competition (only possible for status Preparing or Validated) | Validate a competition (create the matches. only for status Preparing) | Activate the competition so it can follow rules set in Sales Calendar and Activity Profile | Stop (temporarily) the following of the rules of Sales Calendar and Activity profile for the competition. Used to perform a few changes while on sale | Cancel the competition (this does not perform any refund). | Close the competition. (figures are locked, and it is no longer possible to perform actions like sales, exchange/cancellation, cancel reservation, duplicata or reprint) | Duplicate (=copy/paste) the season. Particularly useful to create the parking competition from the main league competition. This does not set the link to the master competition. | Enable the creation of a competion by copying it from another season or another activity. Useful when needing to create similar competitions from season to season | Direct access to the match menu for the selected competition | Process the printing of a test ticket based on the ticket template setup for the selected competition | Export the table with all the competition to an excel file |
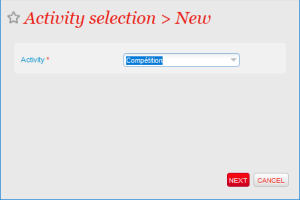
Create a new competition
You need first to select in which activity this new competition will be created. Usually, you set this up in your Competition activity
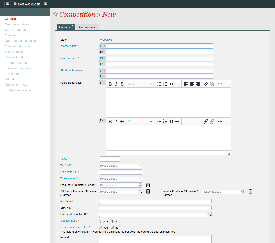
1) General
4) Calendar
11) Ticket logos
12) Validation
13) Access Control Synchronisation
1) General
a) General | General
At this stage you will be able to define :
Internal name (max 60 charac) : name of your competition as it will appear in SecuTix screen (backoffice)
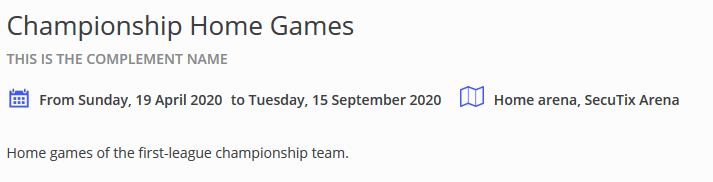
External name (max 60 charac) : name of your competition as it will appear to your public (online and documents)
Short public name (max 15 charac) : name of your competition as it will appear online when accessed from a device with small resolution (smartphone...)
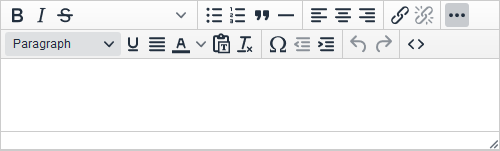
Public Description : description you can set for your event that will appear online. Lots of customization are possible on the inserted elements, including external content insert like images or video with the Source code button ![]() and the use of html codes.
and the use of html codes.
Code (max 8 charac) : code of the product. This code must be unique per entity (ex : not possible to have the same code for two competitions, but possible to have the same code for 1 rate and 1 competition)
Tax VAT : VAT rate that will be used for your event. To be selected among the dropdown elements. See : Institution | Initialisation | VAT Rates
Alert ratio (%) : Percentage of availabilities left from which the competition will be considered as with limited availabilities. This will trigger the availability color used on the ticketshop (it will become Orange as soon as the level is reached) and display the Alert Quota message in the back office.


Ticket model : Ticket model that will be used for the competition (applied for all the matches, if not overloaded at match level)
Producer / Promoter / Partner : useful when using the producer portal. Producer contact (structure of type producer) that can be linked to the product. This contact will be able to access data related to this product in his producer portal.
Additional Producer / Promoter / Partner : useful when using the producer portal. Additional producer contact (structure of type producer) that can be linked to the product. This contact will be able to access data related to this product in his producer portal.
Invoice Producer / Promoter / Partner : useful when using the producer portal. Producer contact that will be invoiced for the product. The contact set in this field has no access to the producer data in the portal but can be the same as defined in the producer fields. Needs to be define even if the producer has been set.
Merchant Id : in case of split payment, configuration of the merchant ID (instead of having it inherited from ePC)
SHA Key : related to the merchant ID, hash key to finalize the setup of the merchant ID
Allow ticket printing before seating : in the case of post seating, you can choose to still issue ticket even if no seat was allocated to the contact. This means that you will need either to handle the seating on event day or to issue a new ticket (that will invalidate the initial one) once the seating applied.
Internet description URL : link to an external page that will appear behind the More Information link. This link is displayed after the Public description on the ticketshop. It aims at directing people to a page where you would usually present the product or the competition. To be used with care as it takes users out of the funnel.
Questionnaire : can questionnaire be associated to this competition (to all the matches included in the competition)?
Include in shipment fee : for cases where shipment fees where set to be Per ticket, you can choose if the tickets of the competition you are creating will be applied the shipment fees or not. This provide the flexibility to say that some products are not eligible for shipment fees.
See Organisation | Initialisation | Shipment Fees
Remark : text field to insert comment. This will remain at back office level.
b) General | Parameter
Complement name (max 60 charac) : text that will appear online between the name and the description.
Internal description : text field that can be used to insert particular comments that will remain on back office side.
Logo 1 : (max size 1 Mo) image that will be used to illustrate the product. This image will appear on the landing page and on different pages of the ticket shop. Depending on the setup of your landing page, you may want to pay attention to the ratio or to where you position the main element in your image.
More info on A dynamic shop window
Audience type : usually kept on All public. For organization handling specific events for Kids, setting Kid in there will trigger the indicator Children Product, allowing you to easily target purchaser of those products.
See : Standard indicators
Otherwise this information can also be used through the API to group products together for example.
Time flexibility : in hours and minutes, this field allows you to set the amount of time FROM the beginning of the match until which you will still be able to sell ticket. For exemple, a time tolerance set as 00:45 will result in having the match still available for sale up to 45 minutes after kick off.
Competition type : you can select there the competition type you have created in Initialization. This field determines which teams will be available for selection on the Calendar page.
"Master" Competition : will linked the competition you are creating to another existing competition. Thus, any change done on the master competition will impact the "child" competition. For example, changing the date and time of a match in the master League competition will change the date and time of the match in the Parking competition. NB : if my parking matches are set to start 1h before the League matches, then the change in the master competition will keep this delta between the two competitions.
Waiting list allowed : for cases where matches are sold out, and if the waiting list is activated, web users will have the ability to enter their email and declare their interest in buying tickets
Season ticket authorised : can this competition be taken through a season ticket product?
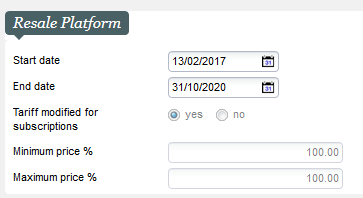
Tariff at which tickets belonging to a season ticket are resold on resale platform : when using SecuTix resale platform, you can set that the resale of any tickets coming from the season ticket related to this competition will be resold at a particular tarif. The benefit there is usually to make sure that anyone coming on the resale platform can purchase any tickets available. And not have a scenario where a ticket coming from a child season ticket can only be purchased by a child. The reseller will only be refunded of the amount of his ticket within his season ticket, and the delta between this price and the price paid by the purchaser will be kept by you. This field will be active with a tariff dropdown only if you set the parameter Tarrif modified for subscriptions on yes in the Organisation | Initialisation | Sales Channels | Points of sales | Internet parameter where the point of sales is the one used for your resale platform.
Countermark accepted : the feature related to this field is not active anymore.
Ticket producer : this field tells SecuTix whether or not a ticket has already been produced. If set on YES, then SecuTix will NOT generate any ticket at the moment of the sale. The use case is when you handle event for third parties, and you have been given directly (thermal) tickets from this 3rd party. You can still set these events in SecuTix and sell them from SecuTix to keep track and be able to report, but the ticket itself will not be a ticket generated from SecuTix. You will have to handle/send the tickets you received out of SecuTix.
1st catalogue number of performances : the use case is mostly for Live Events. This feature allows you to setup the number you want to apply for your matches / performances. In France the VAT rate must change from the 141st performance. Thus this field allows to easily identify from when the VAT rate should be set differently.
Confirmation after reservation (days) : when using reservations, this field give you the opportunity to have a deadline automatically set by SecuTix, calculated in days after the reservation is created in the system. Note : the reservation will not automatically be cancelled once this date reached.
Confirmation before performance (days) :when using reservations, this field give you the opportunity to have a deadline automatically set by SecuTix, calculated in days before the first match included in the reservation. Note : the reservation will not automatically be cancelled once this date reached.
2) Custom variables
Custom variables are to be created in Organisation | Initialisation | Custom Variables.
Custom variables are element you can display on ticket. They are usually used to display static information that can not be setup elsewhere in SecuTix. They are related to the fields Texte_Libre in the ticket editor. See Liste des variables dans l'éditeur de maquettes de billets
They can also be used through API and interfaces between SecuTix and 3rd party system, in order to setup in SecuTix sets of information that will be pushed and handled by the 3rd party system.
TixNGo for instance is using those fields to input the parameters such as the image or the url that will be displayed on the ticket in the TixNGo wallet.
3) Sub-Groupings
Sub-groupings are to be defined in Organisation | Initialisation | Sub-topics. At this stage, you can associate a sub-grouping to your events. This sub-grouping can then be used through APIs to group product together for example.
4) Calendar
This page is where you create your matches.
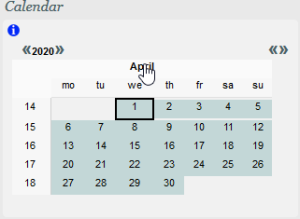
Calendar : you can select there one (to create one match at a time) or several (to mass create) dates on which you will create a match. Navigation buttons allow you to switch month and year. You can select a date by clicking on it directly.
Clicking on the head of the line will select the whole week, on the head of the colum all the related days of the month, and clicking on the month will select all the month.
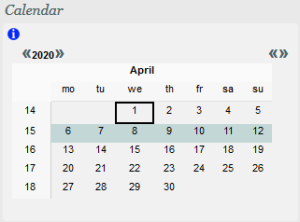
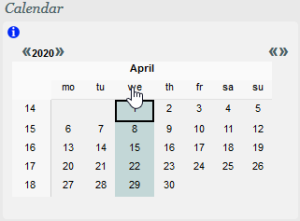
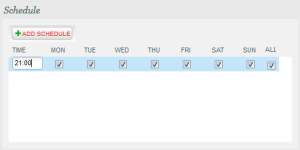
Schedule : once you have selected your day(s), you can set the start time of your matches by entering it in the field Time of the Schedule. Depending on what you have selected, you will have tickboxes on days matching your selection.
In this example, we have selected the whole month of April, so the schedule display tickboxes on every single day of the week. Setting 21:00 as time, i will create matches for which kick off will be at 21:00 each days of the month. A box ticked means the time set apply on the related day.
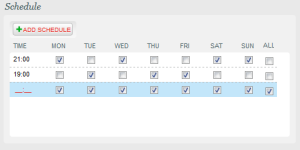
It is possible to set several times and then to adapt the day for which each of them apply. In the example below, matches on Monday, Wednesday, Saturday and Sunday will have kick off at 21:00 while on Tuesday, Thursday and Friday it will be at 19:00.
NB : if the box is ticked for 19:00 and 21:00, it means that there will be a match starting at 19:00 and another one starting at 21:00
Add schedule : this feature is for mass creating schedule, mostly for cases where a same event occurs several times a day during lots of days. Probably not used much in a context of creating competition with matches.
Rate type : the rate type allows you to categorize your matches. You will later be able to apply Charges for a rate type, meaning for all matches sharing the same rate type. This information can be used through APIs to group matches for example.
Site : site in which your matches will take place. This will determine the space and the logical configuration that will be available in the following menu. See Institution | Venue | Site
Space : space in which your matches will take place. This will determine the logical configuration that will be available in the following menu. See Institution | Venue | Space
Logical configuration : logical configuration that will be applied to the matches you are creating. See Organisation | Venue | Logical Configurations
Remark : text field that will remain at back office level.
Opening time offset : in hours and minute prior to the kick-off time, you can set up the opening time of the gates. This information can be used in ticket template and through the APIs.
Duration : expected duration of the match. This information can be used in ticket template and through the APIs. Mostly used in Live Events.
Kind : as the rate type, the kind can be used to categorize matches. The kind is displayed on the match page of the ticketshop. In the example, Default is the match kind. The list of Kind can be modified from Institution | Initialisation | List of values under the entity Performance

Number of breaks : number of breaks your matches will have. Mostly used in Live Events.
Exchangeable ticket : determine whether or not a ticket can be exchanged. If set on No, you will not be able to perform any Exchange/Cancellation on ticket for your matches.
Named ticket : there you can chose to force people to enter a beneficiary for every single ticket that will be generated (eticket, thermal ticket...). If set on No, it will be up to the user to add it or not, and ticket could be printed with no beneficiary set up.
Licence number : you can overload the licence number to apply it on the matches your creating. Mostly used in Live Events.
Logo : you can overload competition logo with a logo set at match level. When used, it is the image displayed on the ticketshop for the related match(es).
VAT : you can overload the vat to apply it on the matches your creating. Mostly used in Live Events.
Match at home : set that the match is taking place Home. This will set the team defined as Team of the organization as Host team automatically.
Match outside : set that the match is an away match.
Day / round : day / round of the match within the competition. The list of Day / round can be modified from Institution | Initialisation | List of values under the entity Match.
Host team : host team of the match. The list of team depends of what has been set in Competition type. If the expect team is not available, you will have to go back to Organisation | Initialisation | Competition Types
Opposing team : opposing team of the match. The list of team depends of what has been set in Competition type. If the expect team is not available, you will have to go back to Organisation | Initialisation | Competition Types
Final date : is the date set for the match the official date ? If set on No, this information will be displayed on the ticketshop and can be used in ticket templates.
Add : clicking on this button will create the matches (status Preparing) following all the parameters you have defined on this Calendar page.
Edit multi-performances : selecting one or several matches and clicking on this button will give you the ability to change the parameters you have set for one or several matches. You will access then the fields specifically for the selected matches. This is where you will be able to set a specific public description for a match instead of having to use the one potentially set at competition level for instance.
Check overlapping : when creating several matches on the same day, this button will check potential overlaps when the end of one match seems to happen after the beginning of another match in the same place. Mostly used in Live Events.
5) Charges table allocation
When using Charges (fees that apply per ticket), you can associate there your existing charge table. You will first need to specify for which rate type it will apply (only used rate type will appear in the dropdown), then select your charge table. Finally, you can specify on which sales channels those charges will be active. Either All sales channels or a List you can set up. You can apply different charges table on different sales channels.
See : Organisation | Catalog | Charges tables
6) Calendar allocation
This screen is for you to set the sales calendars that will apply for all the matches of your competition. You can have different sales calendar for different sales channel, or one for all sales channels.
See : Organisation | Catalog | Sales calendars
7) Activity profiles
This is where you associate the set of rules regarding the selling of your competitions. Among the rules, the sales channels on which the competition will be available.
See : Organisation | Catalog | Activity Profile
8) Payment methods
From this menu, you can define payment methods that can be used to purchase this product.
The rule is as follow : it is the intersection of Point of Sales Payment Methods, Product Family Payment Methods (see : Institution | Initialisation | Payment Methods) and Product Payment Methods.
Thus, if you associate no payment methods in this screen, SecuTix will check for specific Payment Methods set at Product Family level. If none, it means that any Payment methods available on the point of sales will be usable for the product.
The payment method you associate at product level must be available at least on the point of sales. Otherwise nothing will happen.
So if you want to have a payment method that is only available for your season tickets for example, you need to associate this payment method to your point of sales AND associate it at product family level. That way this payment methods will only be available for your season tickets products on your point of sales.
9) Transport Stops
Transport stops are for customers selling combined offers including leisure and public transportation. They may define which stations or stops belonging to a public transportation network allow to reach the product associated.
10) Interface mappings
You can set in this screen your mappings regarding the competition you are creating for the different interfaces and batches you may have. Note : those mappings will only apply at competition level, not matches.
You can also set mappings directly in the related interface. See : Organisation | Tools
11) Ticket logos
Tickets logos have to be uploaded in Organisation | Initialisation | Ticket logos.
There you can associate the ticket logos you have created to the competition you are creating. Those logos can appear on the ticket templates, as you can set up to 10 fields using those extra logos.
This menu is usually used to insert partners / sponsors logos when those can change from one competition to another.
This menu can be seen as visual comfort variables as ticket logos just have to be images. What is in the image itself depends on your imagination.
This menu can be hidden directly from operators rights if need be.
12) Validation
The validation step will make sure that you did not forget to set any mandatory information. In such a case, the message displayed will refer to what is missing. If nothing is missing it will proceed in the actual creation of the competition and its matches, that will become available for Running.
13) Access Control Synchronisation
When using SecuTix Access Control, this screen allows you to synchronize directly the product you have just created with SecuTix Access Control.
The season of your product must already exist in the Access Control.
Obviously this screen is useful only if you have already sync your season with the Access Control, but created the product afterwards.
Next Step: setup the other competitions and/or the related Season Tickets