orts
Once you have created an email template and a target, you'll be able to create a campaign (Organization context, Audience Management module, Campaign menu). As you can see below, here you'll also find any previous campaigns created within your institution:
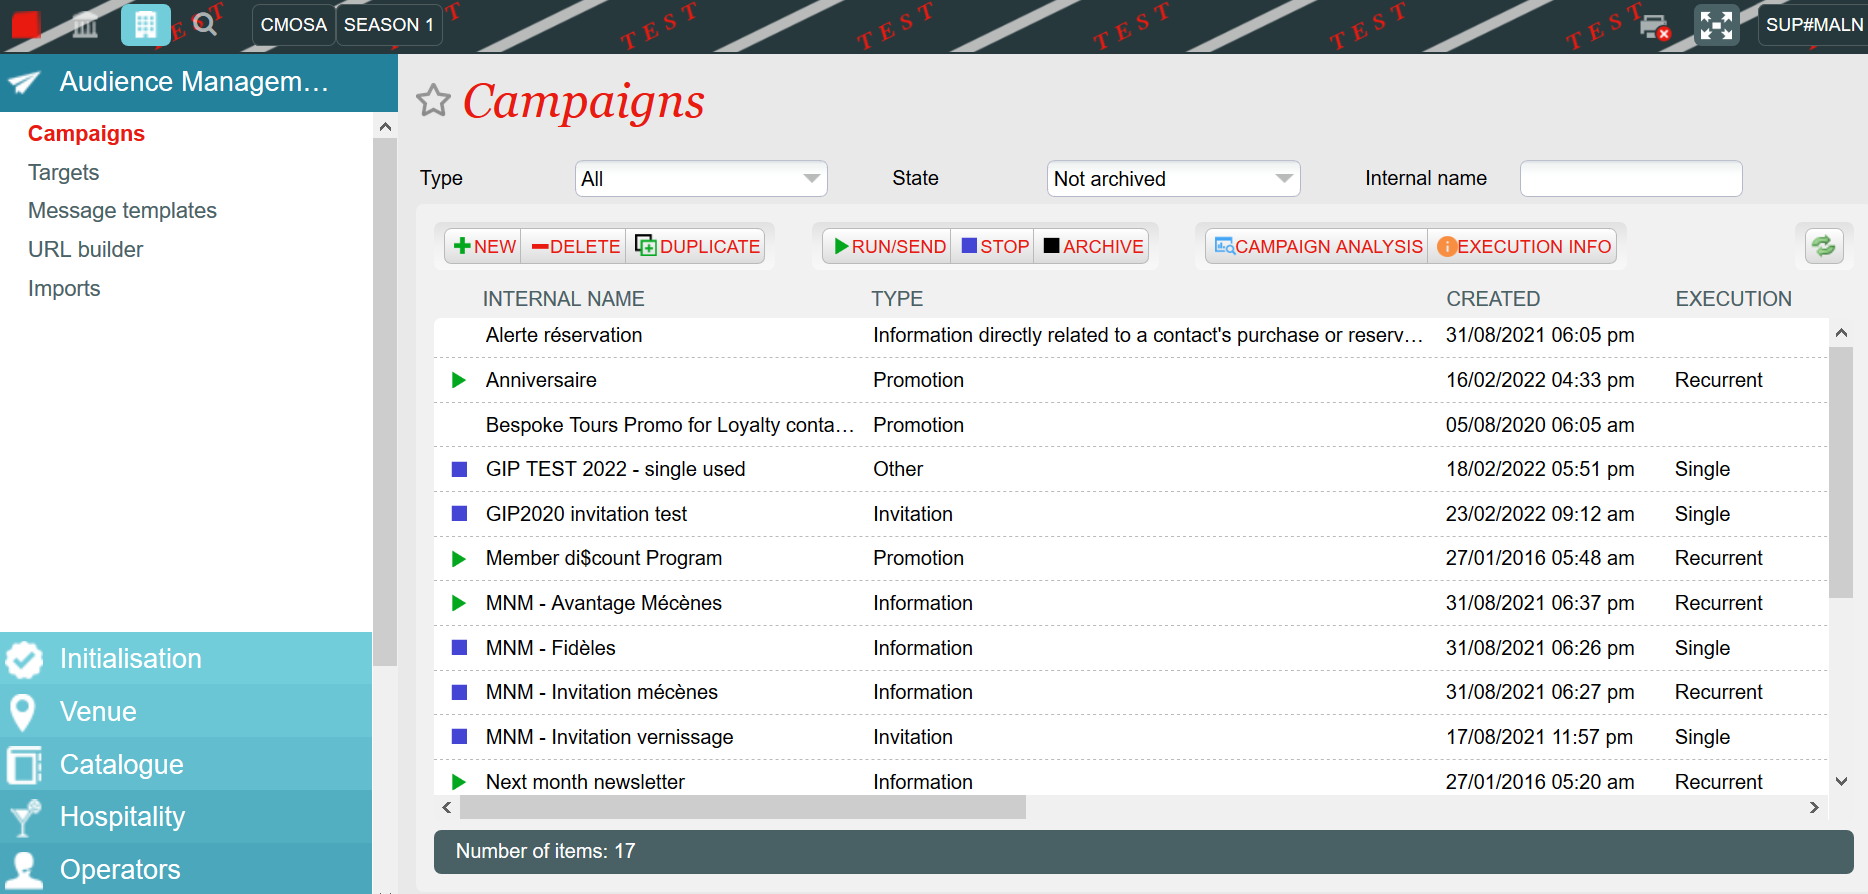
As you can see above, you'll be able to filter them by type and state. The campaigns that will be displayed by default have a "Not archived" state and include all types. It could happen that you might want to duplicate a past campaign and wont find it: remember to change the state filter and search among the "Archived" ones. You can also stop a campaign, archive it or delete it.
In this page we are going to go through the following topics:
3.1. How to create a new campaign
3.2. Launching a campaign
3.3. The campaign life cycle
And a Q&A.
3.1. How to create a new campaign
To create a new campaign, click on the "New" button, and the following pop-up screen will be displayed:
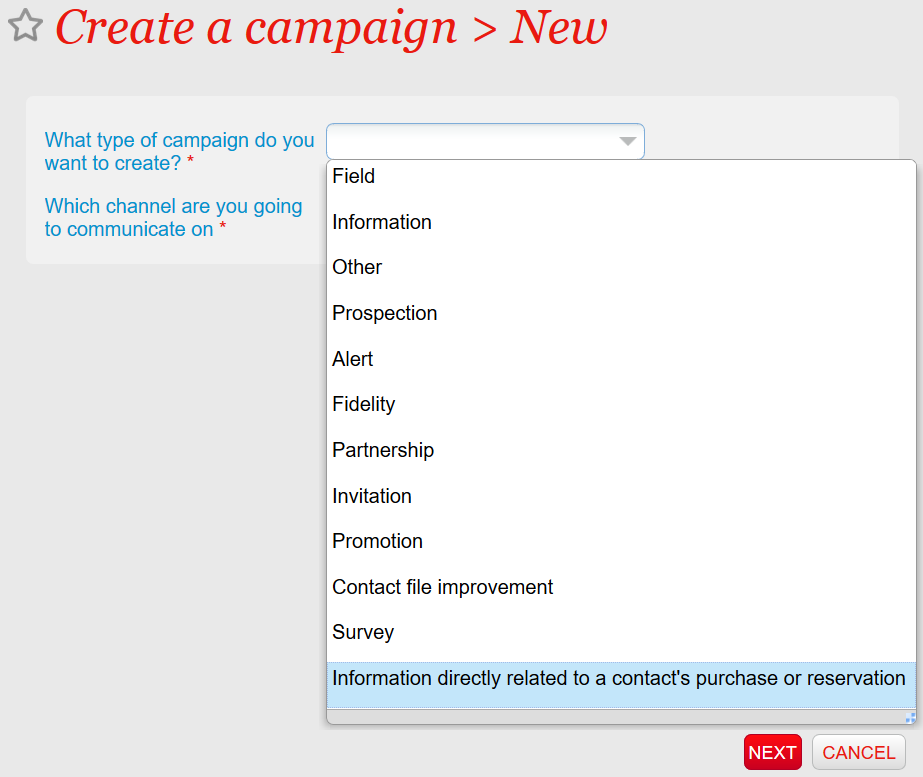
You will have to choose the type of campaign that you'll like to create (What type of campaign do you want to create?*). Most of them are just informative and work in exactly the same way, but there are a couple of important exceptions ![]() :
:
- The "Information directly related to a contact's purchase or reservation" will bypass GDPR restrictions: Even if a contact has chosen not to receive any kind of marketing "communications from your institution" (see contact file), when they make a purchase or reservation they do agree to receive a communication directly linked to those. For example: This kind of campaign should be use to communicate to your clients that an event they purchased a ticket for, or made a reservation, has been postponed or cancelled.
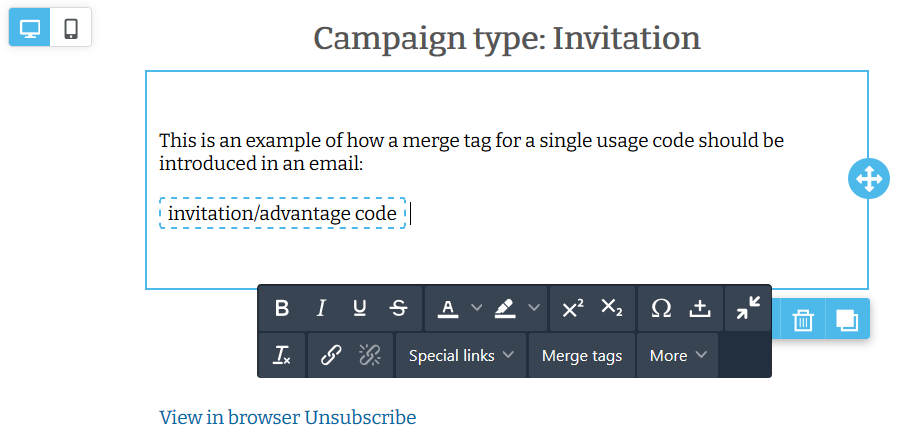
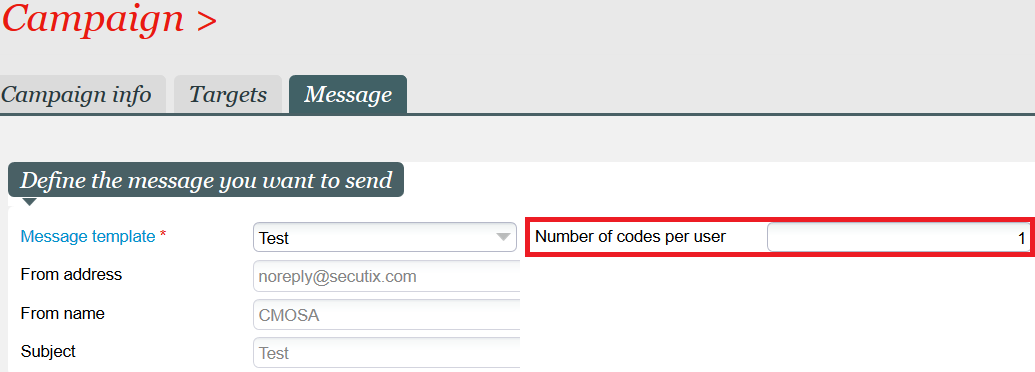
- If you want to distribute single use codes, you must choose the "Invitation" campaign type: It is fundamental that the email template that will be linked to this campaign type has an "invitation/advantage code" merge tag (see picture on the left). In addition, when linking the message template to the campaign, you need to set how many codes per user you want to sent. Even if it doesn't appear as mandatory*, it is!
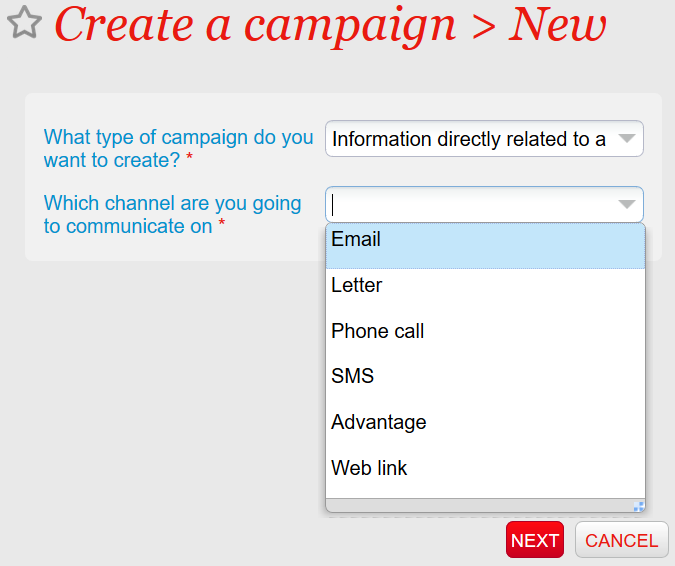
As well as the type, you will have to choose the channel of the campaign that you are going to create ("Which channel are you going to communicate on*"). However:
- SAM can only manage directly emails, advantages and web links:
- Emails: This will be the most usual option to choose. Through this option, you will be able to link the campaign to an email template, one or multiple targets, and an advantage at the same time. We'll explore this option below in this page.
- Advantages: Selecting this option, you will be able to distribute an advantage to one or more targets without sending an email or any kind of notification. Therefore, there are no GDPR restrictions whatsoever.
- Web link: This last one is not properly enabled to be created from here. It is, however, the type of campaign that would be automatically generated from the URL builder.
- SMS: This option needs to be discussed with the project manager if you'd be interested in using it. The possibility of enabling it depends mainly on the country and the phone services providers.
- Letters and phone calls: You will be able to link these kind of campaigns to a target. However, you will have to manage making the phone calls and sending the letters outside of Secutix. Therefore, you will not be able to get an analysis of your campaign through Secutix, you'll have to manage it aside, externally.
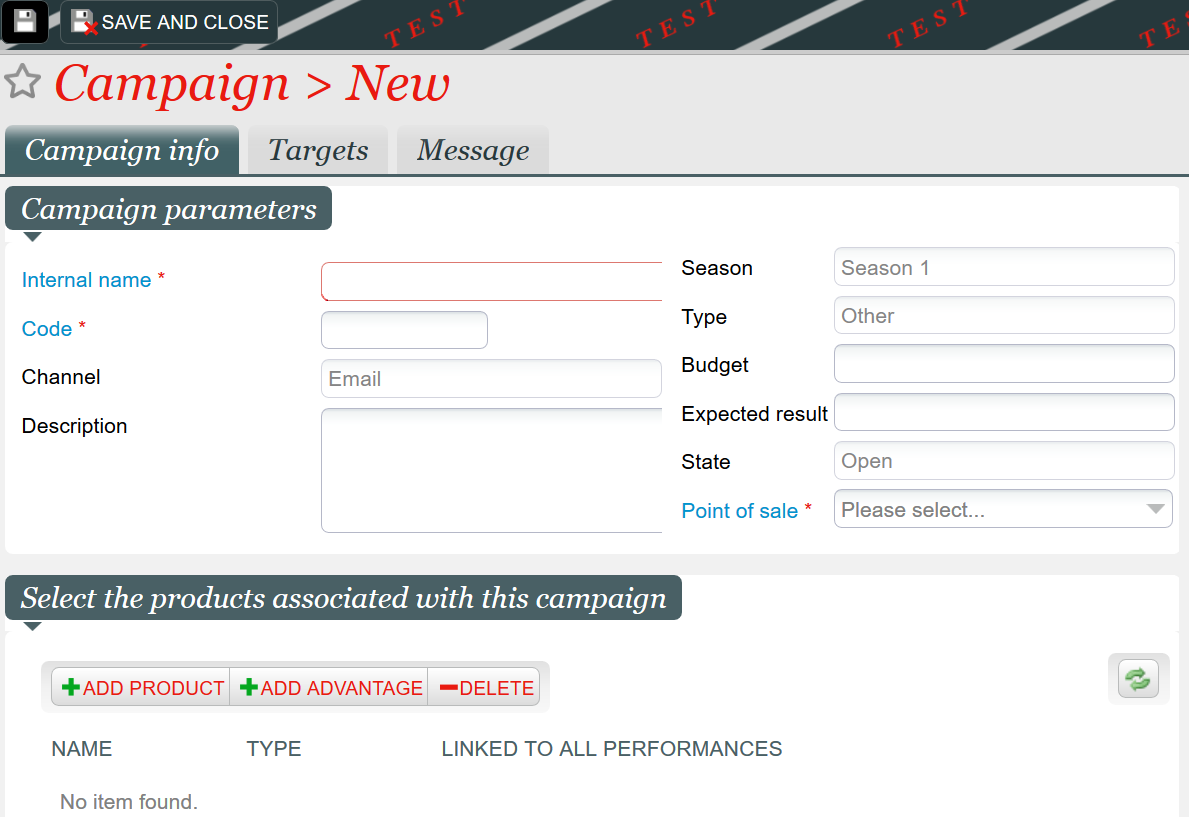
Once you click on "Next", after choosing the campaign type and selecting the "email" channel, the following pop-up screen will be displayed:
![]() As you can see in the image above, you can link products and advantages to your campaign:
As you can see in the image above, you can link products and advantages to your campaign:
- Advantages: If you have a "invitation/advantage code" merge tag in your email that is not a single use code (see invitation campaigns above in this page), or if you want to distribute an advantage among your contacts and tell them about it in the email, you must link the advantage here.
- Products: The linking of products, however, is almost never used as it doesn't track the sales: It's just informative.
Within the CAMPAIGN INFO TAB, you will be able to set the campaign parameters:
- Internal name* and Code*: Remember that the campaigns are visible by all the organisms within your institution, so we recommend to choose a name that will help you identify and find it fast when ordering the list of campaigns by name. For example, you could always start it with the acronym of your organism.
- Channel: Already selected on the previous step, cannot be changed.
- Description: We recommend writing a clear and detailed description of the campaign.
- Season, type and state: As you are already working within a season, and the type was selected on the previous step, they cannot be changed. The state will evolve as the campaign is launched. We'll see the life cycle of campaigns later on.
- Budget and expected result: When giving information on the budget allocated to a campaign, SAM will automatically calculate the ROI (Return on Investment) by substracting the budget to the income generated by the campaign. You can also introduce an expected result as reference.
- Point of sale*: In order to be able to track any URLs and advantages in your campaigns, and in the case of unsubscriptions, we need to link campaigns to a point of sales.
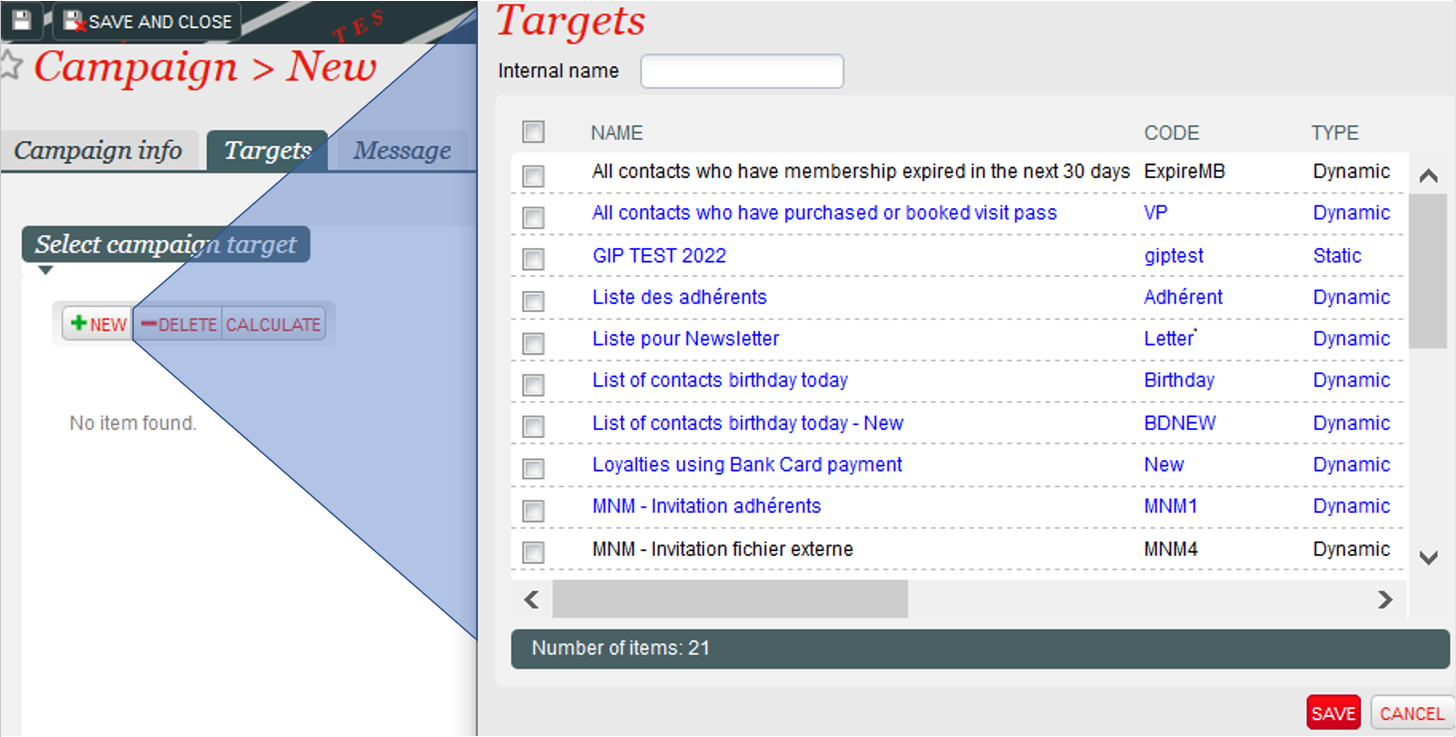
Within the TARGET TAB, you will be able to link as many targets as you want to the campaign by clicking on the "New" button.
SAM will automatically carry out a deduplication to avoid sending the same email to a contact found in two targets.
As you can see, there are some targets in blue, and some in black:
- The blue targets are targets that are already being used in at least one other campaign.
- The black targets have not yet been linked to any campaign.
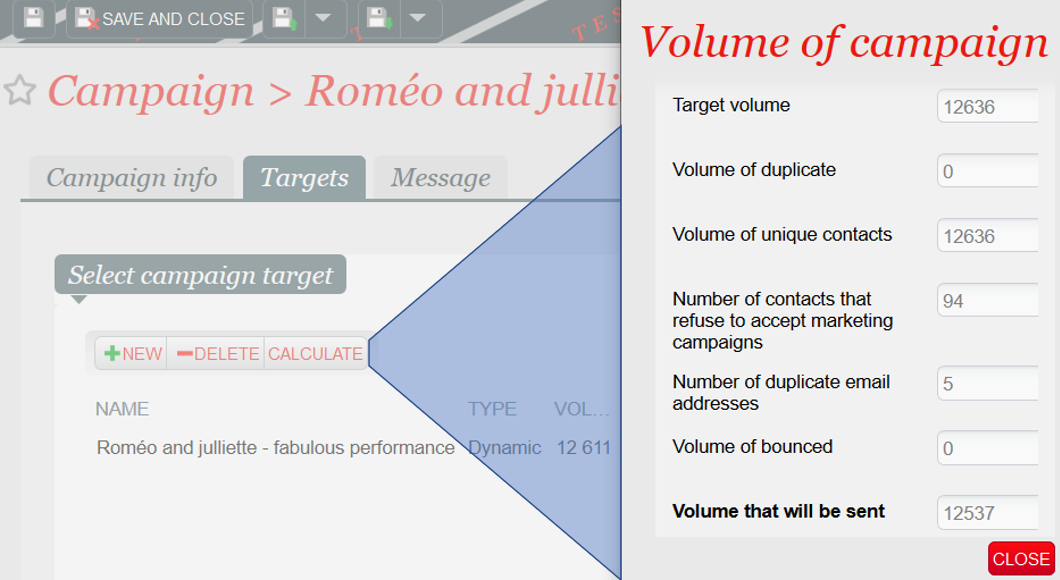
If you click on the "Calculate" button", you'll be able to see the details of the real volume of emails that will be sent in the campaign: taking out duplicate contacts, duplicate emails, contacts that have not accepted to receive marketing communications (applicable if it's not a campaign related to a purchase or reservation...). If the targets you selected are dynamic, the calculations will vary accordingly.
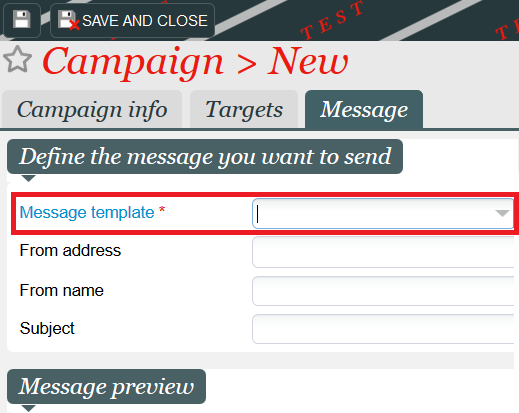
Finally, in the MESSAGE TAB you'll be able to select the message template* you wish to use for your campaign.
Do not forget to save and close!
3.2. Launching a campaign

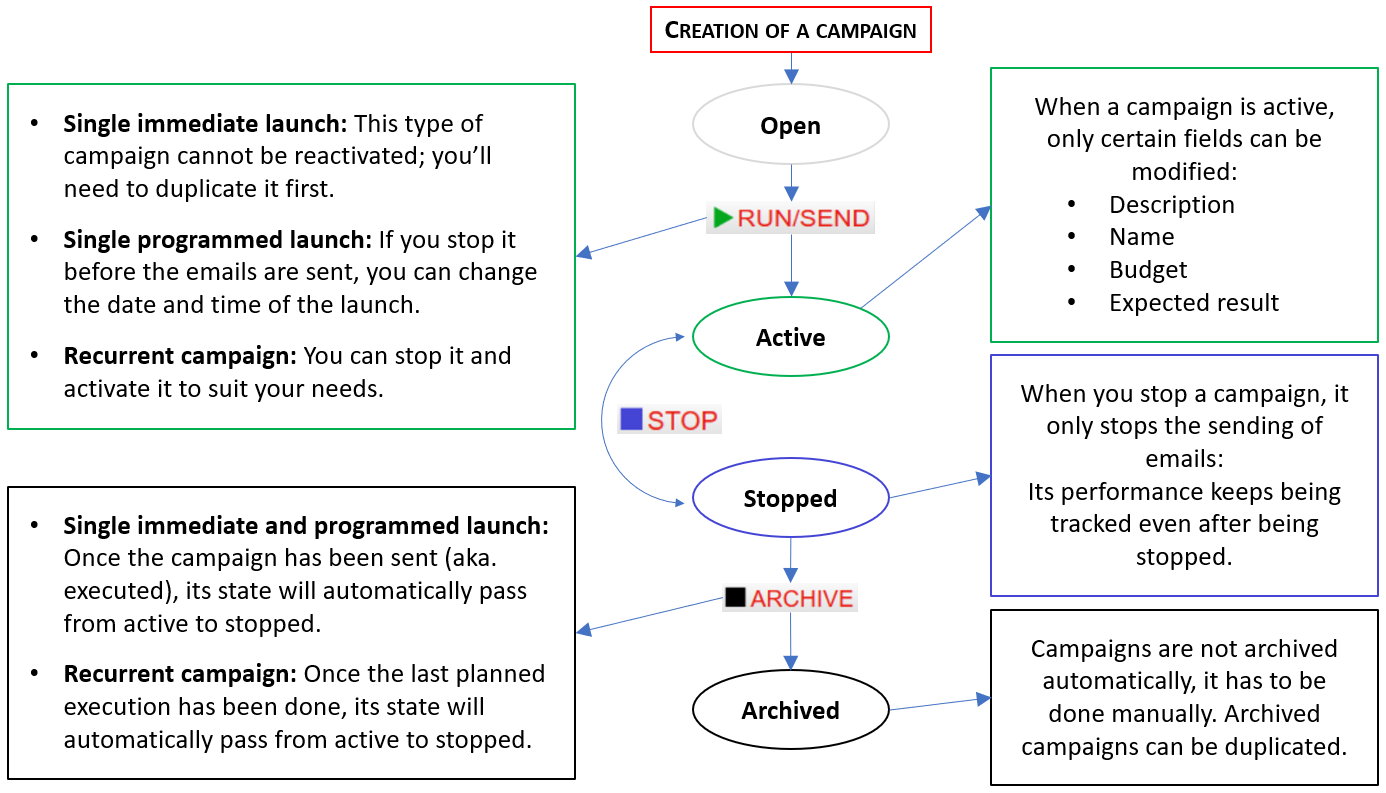
The campaign you just saved will now appear with all the others, but just in an open state: You won't see any of this symbols ![]() beside its name. To launch it, you will have to select the row and click on the "Run/Send" button.
beside its name. To launch it, you will have to select the row and click on the "Run/Send" button.
In the pop-up screen that will then appear (see image on the left), you'll be able to select whether you want to:
- Immediately launch the campaign, just once: Send now.
- Choose the date and time for the campaign to be launched once: Send later.
- Create a recurrent campaign: Set a recurrence. Each sending is an execution. This type of campaign is principally meant to be used with dynamic targets.
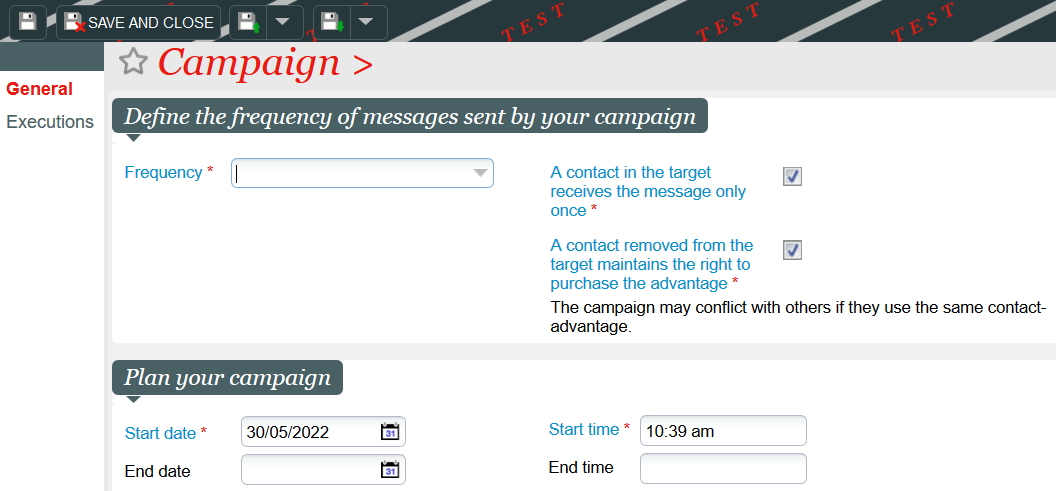
If you choose to create a recurrent campaign, you will have to set a frequency (every 5 minutes, 1 hour, 24 hours, a week...), the start date and start time, and think about whether you need or not you need to check the boxes (see image above):
- A contact in the target receives the message only once: If this box is ticked, once a contact in the target receives the message of the campaign, he will not receive it ever again despite how many times it is executed.
For example: You want to send a welcome email to every new contact of your institution. There will be new contacts every day, but you don't want to send all of your contacts this message more than once.
- A contact removed from the target maintains the right to purchase the advantage: Every time the target is recalculated (= frequency of the campaign), contacts that received a message in the previous execution might not be the same ones as they will be now. Checking this box you enable the contacts that received an advantage in a previous execution to continue to be able to use it.
When planning your advantage campaigns, be careful not to create internal conflicts if you were to set a same advantage in two different campaigns, for example.
The only thing left now would be to save and close.
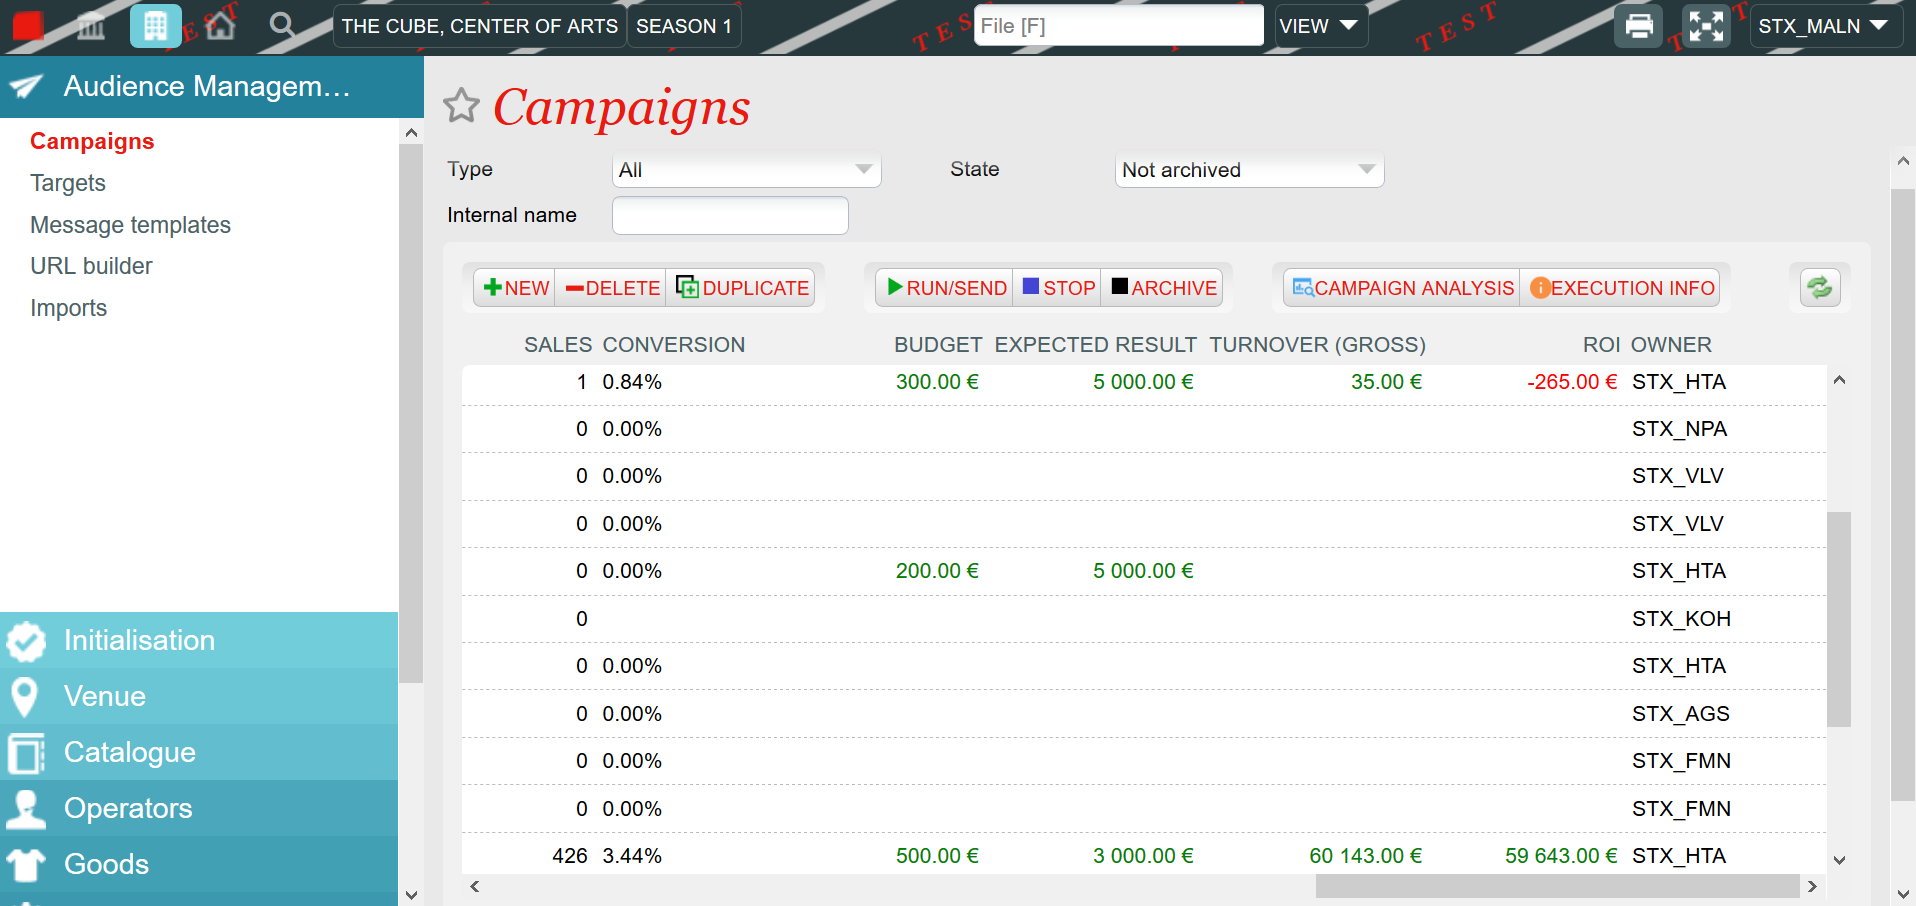
After a campaign is executed for the first time, after a few hours or days, your contacts will have started opening their emails. You will be then able to follow the performance of the campaign by selecting its row and clicking on the "Campaign analysis" button. A report will then be generated, with data regarding the open rata, the click rate, the conversion rate, the income generated...
As you can see in the image above, some of the metrics of the report are directly available on the campaign list screen, enabling you to oversee and adjust accordingly your marketing efforts. You can also check the performance of every single execution by selecting the row of your campaign and clicking on the "Execution info" button.
3.3. The campaign life cycle
Q&A
Old page - English: How to create a campaign
Old page - English: How to create a recurrent campaign?
Old page - English: Campaign types
Old page - French: Comment créer une campagne ?
Old page - French: Comment créer une campagne récurente ?
Old page - Spanish: ¿Cómo crear una campaña?
Old page - Spanish: ¿Cómo crear una campaña periódica?