Due to the difficulty and integration and support pain, this interface must not be deployed anymore, until it has been entirely rewritten.
Please contact LKL for any question.
What is Otipass?
The digital passport of your territory Otipass proposes innumerous territories ( Paris Jerusalem Nantes Reims Bordeaux Lille Grenoble Côte d'Azur Villeneuve Nancy Mulhouse Alsace Dijon) digital passes to visit freely the most beautiful local sites. Every Pass is a real good plan: you benefit from a free entrance to each of the partner sites.
You can choose the duration of validity of the Pass according to the duration of your stay.
Otipass cards are now supported in SecuTix, which means visitors can enter as many museums as they wants in a given day with a single Otipass card.
In order to allow entries with Otipass cards, the following steps need to be configured:
- Validate scanned cards with Otipass system.
- Integrate sales in SecuTix with controlled Otipass cards.
Validate scanned cards with Otipass system
SecuTix Access control system system.
- In Institution menu / Organisations / open the access control parameters of the organization and check that the version of the APÏ used is 1.4+
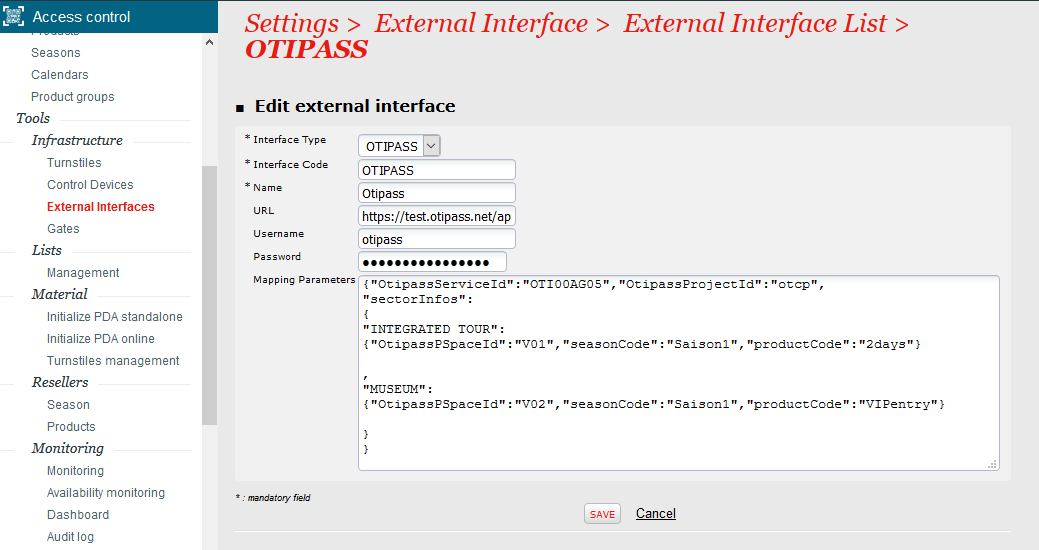
- In Organization/Access control/External interfaces, create a new Otipass interface, containing the setup information received from Otipass
- Interface Type: OTIPASS
- URL, Username, Password information will be provided by the Otipass system as an api Key
Ask that the Otipass url is added to the autorizations in the proxy for tnac.
- Mapping Parameters
- Otipass information: SectorCode has to be defined in the mapping with the Otipass SpaceID.
- SecuTix information: SeasonCode and ProductCode are mandatory to create Sales in SecuTix.
Common problems
- The URL entered must end by /api. If Otipass provided a different url, like: https://otipass.net/api/toulouse, the part in bold must be removed and entered in the json as OtipassProjectId
- Check that the JSON syntax is correct (for example using https://jsonlint.com/)
- The screen of external interfaces of tnac is buggy. It will remove the password each time you save. So you have to manually add everytime you do any change.
Here you can download a correct reference mappings parameter.
Example: (do not copy-paste it. And if you take an inspiration of it, do not forget to remove the //comments)
{

   "OtipassProjectId":"toulouse", //The project id of Otipass. It is generally the last part of the url that they provide.
   "NumType":"serial", //define this value if the pass codes start with letters
   "sectorInfos":{
      "DDMM_AUG":{ //This is the sector code as defined in TNAC configuration.
         "OtipassServiceId":"pcumid031fs00061", //Provided by Otipass
         "OtipassPSpaceId":"PROVIDER#PCUMID031FS00061", //Provided by Otipass
         "seasonCode":"DDMM23", //Those are the season and product codes on which the sales will be processed.
         "productCode":"PASSTOU"
      },
      "DDMM_MSR":{
         "OtipassServiceId":"PCUMID031FS00071",
         "OtipassPSpaceId":"PROVIDER#PCUMID031FS00071",
         "seasonCode":"DDMM23",
         "productCode":"PASSTOU"
      },
      "DMM_DUP":{
         "OtipassServiceId":"PCUMID031FS0006E",
         "OtipassPSpaceId":"PROVIDER#PCUMID031FS0006E",
         "seasonCode":"DDMM23",
         "productCode":"PASSTOU"
      }
   }
}
Beware of the following two points:
- In the parameters, a given sector code can only appear once.
- The device scanning Otipass tickets must be linked to a door which must be associated to only one sector.
Scanning Otipass cards
There are two steps to the scanning:
- Detection: recognize Otipass card by using their detection algorithm (Card length + checksum + barcode content)
- Validation: card is validated by Otipass external system via the interface defined as above, result will be returned automatically to the access control server.
The operator will know the results is the visitor card is valid or not .
Once the valid card is scanned successfully, the access control server generates a specific barcode with format: "OTI+cardnumber+timestamp" and stores the additional information SeasonCode and ProductCode on this barcode.
Notes:
- In offline mode, only the detection step is done. If the scanner recognizes the Otipass card, then the access is granted.
- In the post-synchronization of offline checks, Otipass controls are stored with a specific barcode + seasonCode + productCode in the SecuTix access control server, similarly to the online mode.
Sales reintegration in SecuTix with controlled Otipass cards
For each successfully scanned Otipass card, an order with a corresponding ticket will be created in SecuTix as a regular sales in order to have a consistent view of the sales and attendances in the reporting.
This requires the following configuration:
- Synchronize Otipass barcodes to SecuTix thanks to the new version of the access control interface (v1.4) and a new mapping between ProductCode and Tariff. ( How to below)
- Create sales using the current external sales interface.
SecuTix catalogue and specific external sales interface
As the Otipass card can be controlled several times, the Otipass related products have to be configured using the Open Pass product family.
- Create an Open pass that will represent the Otipass entrances.
- Create an External Sales channel: type "STX_File" (Note: Sales channel Code has to be exactly "OTIPASS")
- Associate an external contingent to that sales channel (let us call it "OTIPASS", but the name and code do not matter)
- Create Otipass contact allowing payment mode Pending account.
- Create an external interface related to that sales channel.
- Give Otipass contingent quota to the OTIPASS product.
- Add a mapping in the access control interface (see below)
New mapping in SecuTix Access control interface
For each Otipass managed product sold by SecuTix, enter a mapping to the Tariff CODE for which this product must be sold
(see example below)
