Enhanced E-commerce Tracking offers deeper insights and more accurate tracking data of online shopping engagement, Google Analytics.
Our Enhanced E-commerce feature has been further extended and is here to support almost all the measurements of users' interactions.
SecuTix ticketshop offers a data layer interface compatible with E-commerce tracking (data about events and commerce data pushed via standard JavaScript from our funnel pages), providing key information about the purchase and the various purchase steps as detailed below. Note that for security/PCI reasons, we do not push any tracking information from our payment page.
Our data layer content is common to all our customers (when activated) and compatible with our supported default setup within Google Tag Manager (which we offer as a service provided by our service team). Customers relying on the data layer to perform custom tracking with their agencies are responsible for the usage of the data layer data provided as-is and are kindly requested to point out which data layer element does not have the expected value based on the below documentation when raising an incident so that our engineering team can perform the analysis without requiring to dig into the customer-specific setup.
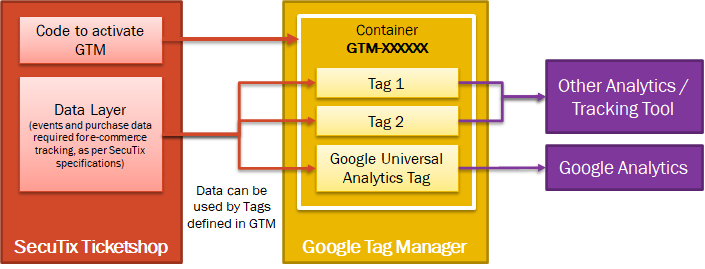
Overview of how tracking works in conjunction with SecuTix Ticketshop
SecuTix ticketshop integrate with Google Tag Manager (GTM) as the only supported tagging tool at the moment. GTM tracking is activated via the back-office by providing a container ID. Once setup, the GTM tracking code is added on all ticketshop pages with the exception, for security reasons, of our payment page.
In order to expose data relevant to e-commerce tracking to GTM, we have a standardized implementation of a data layer. Based on the description provided in this Confluence page, we push relevant event and purchase data designed to work with e-commerce tracking.
Within GTM, tags are defined within the container to inject content (HTML/JavaScript) on the SecuTix ticketshop page generally for the purposes of adding analytics tags. We offer 2 different options:
| OPTION 1 - SECUTIX-MANAGED GTM | OPTION 2 - CLIENT-MANAGED GTM |
|---|---|
SecuTix can provide a standard setup of GTM that includes basic and e-commerce tracking with Google Analytics (subject to a service fee). Additional trackers/analytics tool can be evaluated for inclusion as a service (subject to a service fee). | For customers with GTM capabilities (internally or via an agency), the setup of GTM can be performed autonomously, following the recommendation on this page. In this case, SecuTix is not responsible for the accurate setup with GTM. In case of tracking issues, our support team will need to get precise information about which event/data listed on this page is not surfaced correctly. In this case, the client is allowed to integrate any tags that he wants provided he is not breaking the behaviour of the ticketshop. |
Note
| GA Set Up - Not Supported |
| We only provide documentation and guidelines for setting up Google Analytics (GA). We do not offer direct support for GA implementation. |
| Data Layer |
We provide documentation and guidelines, however, we do not support third-party tools outside of SecuTix control, such as Meta, Matomo, or other Tag Analytics tools. Support for data layer implementation is available in specific cases: |
| a) Events triggered incorrectly with the correct setup. |
| b) Experiencing sudden errors without changing configurations (following our guidelines). |
How to migrate to Google Analytics Enhanced E-commerce
This guide describes step-by-step how to migrate to the Google Analytics Enhanced E-commerce Tracking from the traditional E-commerce tracking, a new feature that SecuTix supports in Whymper V2. We recommend migrating your Google Analytics E-commerce today to take advantage of the new key features
Prerequisite
Please note that our Enhanced E-commerce Tracking is only supported if you are using Universal Analytics tracking and Google Tag Manager.
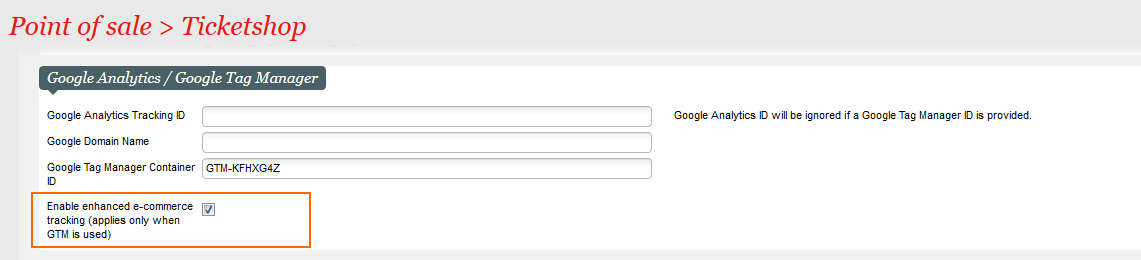
1. Activate Enhanced E-commerce for the Point of Sales
Login to your SecuTix back-office, and activate enhanced e-commerce for the corresponding Internet point of sales via the screen Organisation > Initialisation > Organisation Parameters > Sales Channels > Point of Sale > Internet Parameters.
Wait for a few minutes for the corresponding PoS to be updated with the latest parameters.
Verification
Once the PoS parameter is successfully updated, you could verify whether your activation works by doing a test purchase.
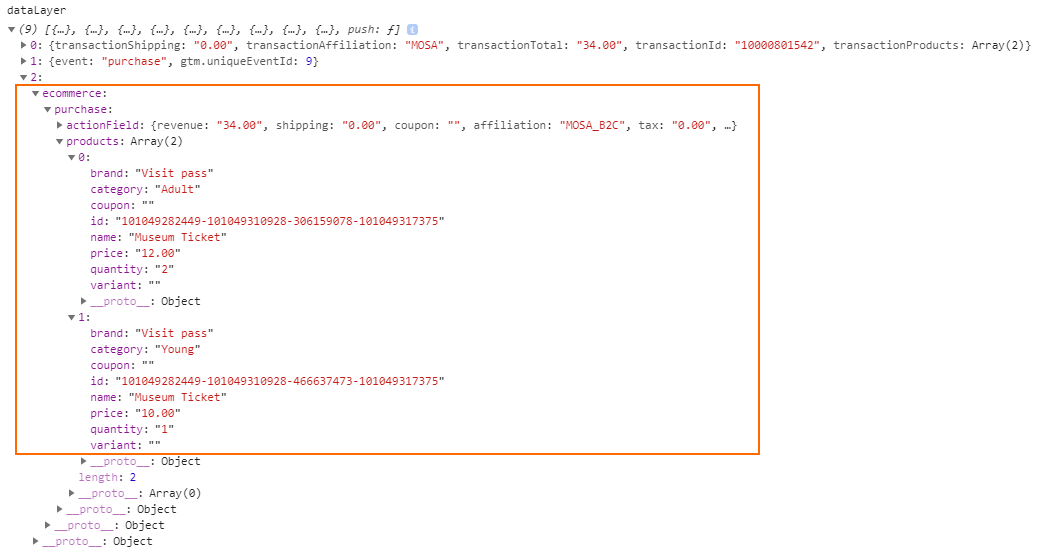
When you reach the Confirmation Page of your test purchase, do the following:
- press the "F12" key to open the Console (or right click the mouse and choose "Inspect Element")
- type "dataLayer" in the Console and press the "Enter" key
- if you can find the JavaScript object called "ecommerce" inside the dataLayer object (as highlighted below), then that means the activation step works.
2. Activate Enhanced E-commerce in Google Analytics
- Login to your Google Analytics account
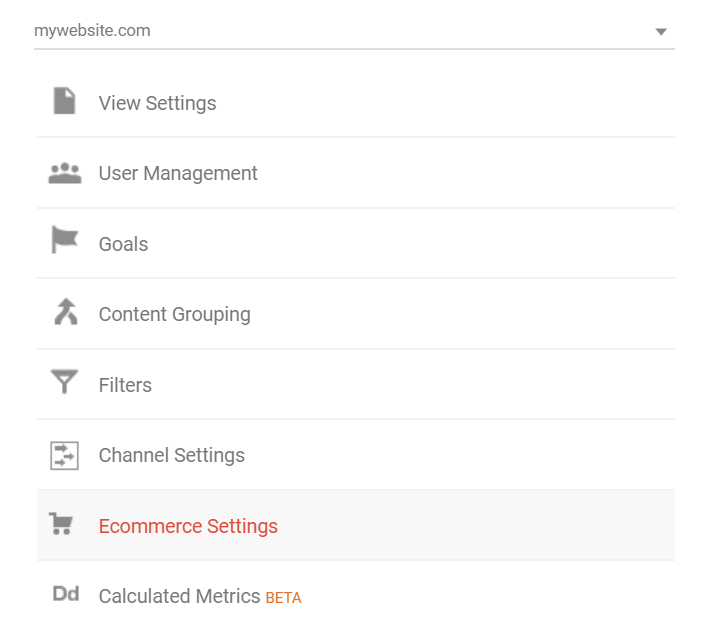
- Go to the Admin page
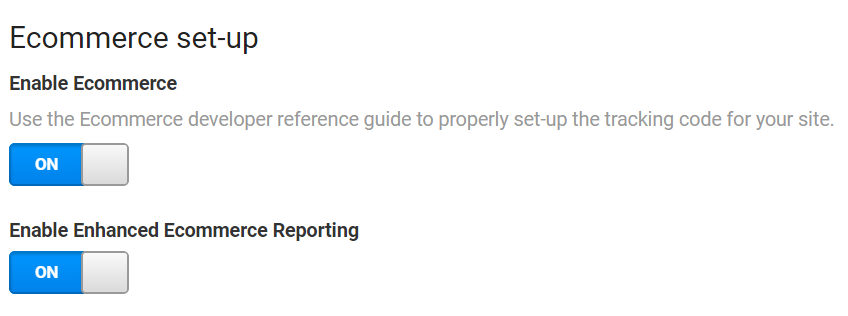
- Find the corresponding "View" where your online ticket shop is configured to send the tracking data
- Click on the "Ecommerce Settings"
Activate the Enhanced Ecommerce Reporting
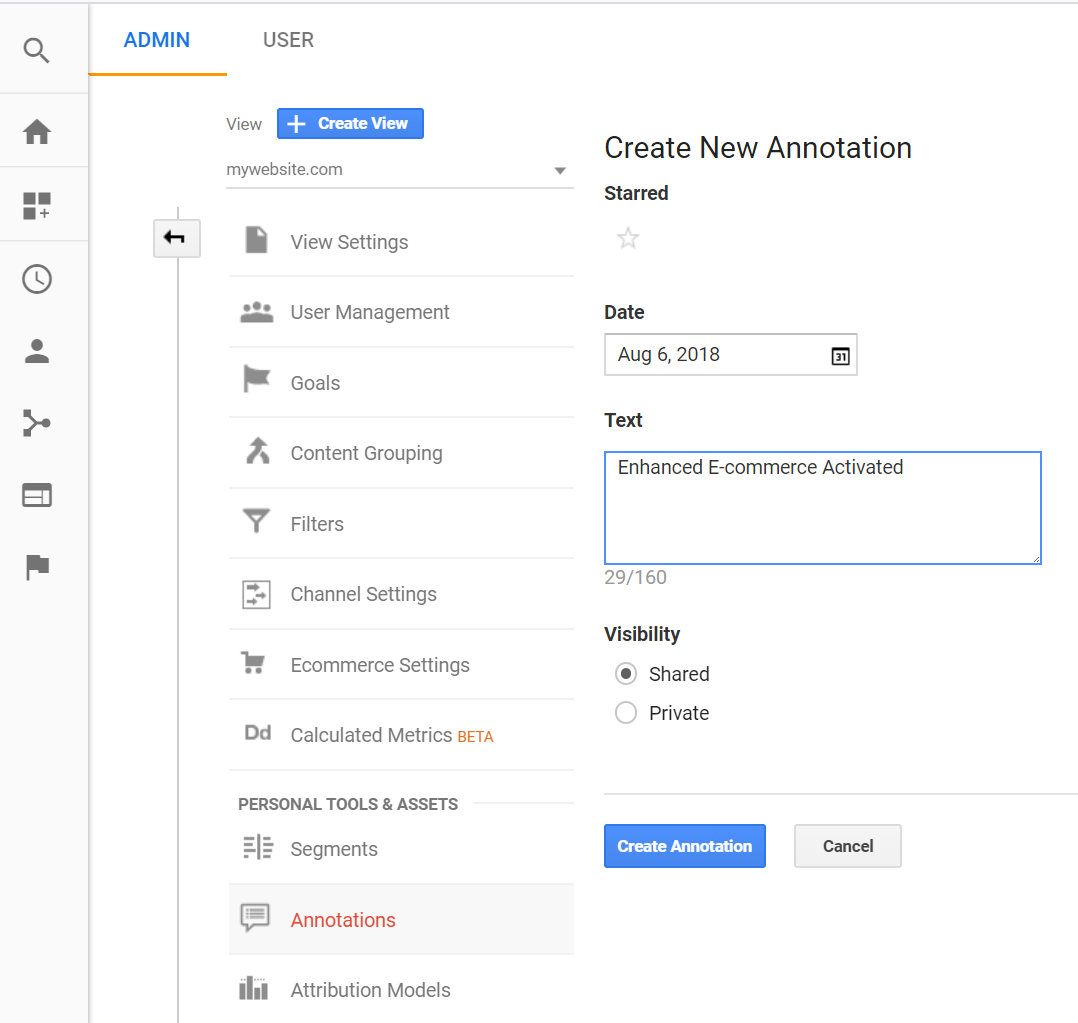
- Add a new Annotation to mark the date when you activate enhanced e-commerce
3. Setup Google Tag Manager
Once you have activated the enhanced e-commerce tracking at the dataLayer level and inside Google Analytics, the final step is to configure the tags properly in your associated Google Tag Manager account.
3.1 Deactivate The Existing Traditional E-commerce Tag
Please note that this is an important step. If you couldn't configure it properly, you might end up having duplicated transactions in your Google Analytics reports.
To successfully migrate to the Enhanced E-commerce, first we need to deactivate the existing traditional e-commerce tag.
- Login to your Google Tag Manager account
- Open the Tag where you configured the traditional e-commerce tracking
- On the top-right corner, click on "Pause" via the options menu to pause the tag
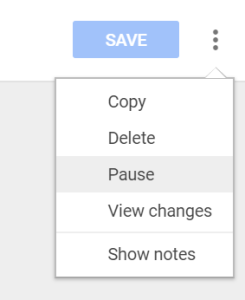
- Click "Save" to save the changes
3.2 Enable Enhanced E-commerce
The second step is to enable enhanced e-commerce tracking inside your existing Universal Analytics basic tracking tag.
- Open the Tag where you configured the Universal Analytics basic tracking
- Open the "More Settings" > "Ecommerce" option and check both checkboxes as shown below
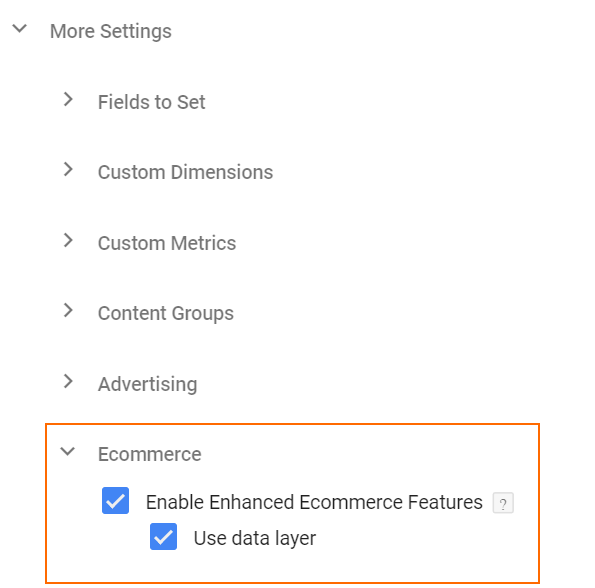
- Click "Save" to save the changes
3.3 Preview & Publish
- Click on the "Preview" button at the top right corner
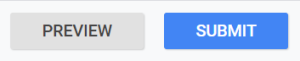
- Inside the same browser, open your target online ticket shop in a new tab
- Do a test purchase
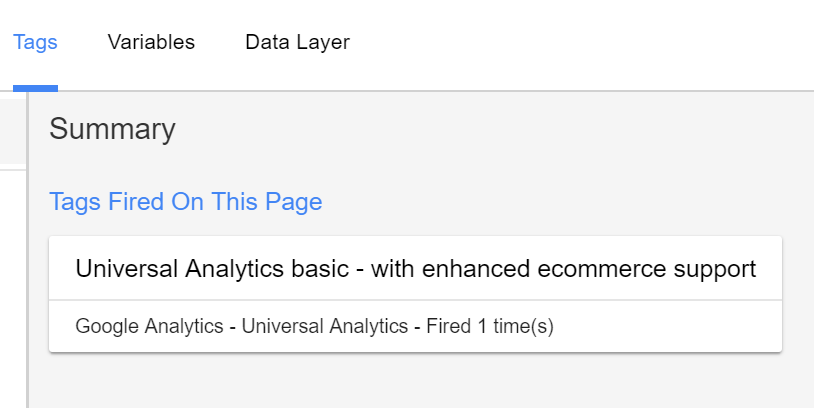
- On the Confirmation Page:
- note down the Reference ID (i.e. File ID) for this transaction displayed in the thank you message
- verify that there is only one e-commerce tag fired (as shown in the example screenshot below)
- Go to the corresponding Google Analytics account
- Click on Conversions > Ecommerce > Sales Performance report and change the date range to the current date
- Wait for a few minutes and keep refreshing the page until you see the Reference ID of your test purchase appears in the Sales Performance report
- Go back to the Google Tag Manager account
- Click on "Submit" button to publish your GTM container if the above steps are verified to be correct
- Done!
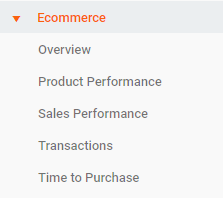
Enhanced e-commerce tracking
New Google Analytics Reports
If you activate Enhanced E-commerce in your Google Analytics Admin page, you will notice that Google now offers double the number of e-commerce reports compared to traditional e-commerce. However those new reports need the corresponding data to be properly tracked on the ticket shop side. With your best interests in mind, our goal is to track and send more detailed user online shopping engagement data in order to enable these new enhanced e-commerce reports one by one. With the release of Whymper V2, a first set of the new reports, including Order Coupon, Product Coupon, Affiliate Code and Product Brand reports, will finally be filled with the correct data!
|
|
|---|---|
| Traditional E-commerce | Enhanced E-commerce |
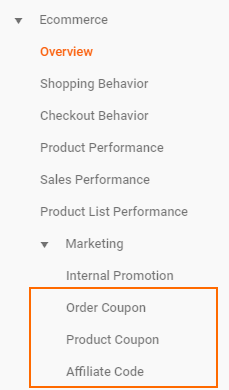
Measuring External Marketing Effort and Coupon Usage
Do you ever wonder the following questions? How are my coupons (either at a product level or an order level) being used by online customers? How effective are these coupons? How often are they being used?
You can now have a more insightful understanding on how well each of your promotional codes and advantages performs through the Order Coupon, Product Coupon reports. Order Coupon report groups and compares the sales by the promotional code used by the user at order-level (on Order Summary Page). Product Coupon report provides the same insights but for advantages used at the product-level. Both reports help you measure your external marketing effort in promoting the coupons and advantages and understand how they are used by users. Analyzing the data could also help you take necessary actions to improve the performance.

Order Coupon Report Example
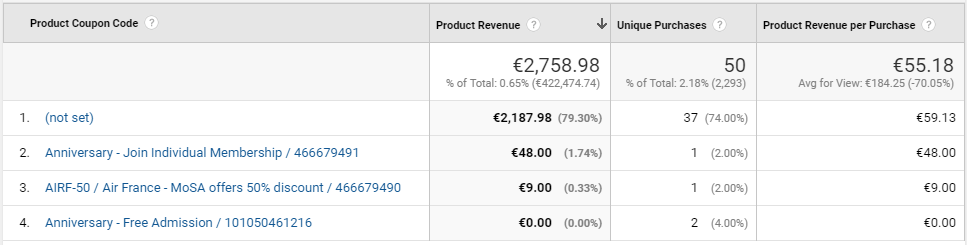
Product Coupon Report Example
Comparing Sales Performance Among Multiple Online Shops
Besides measuring coupon usage, the new Affiliation report offers a way to easily compare sales performance among multiple online shops, if you have more than one configured.
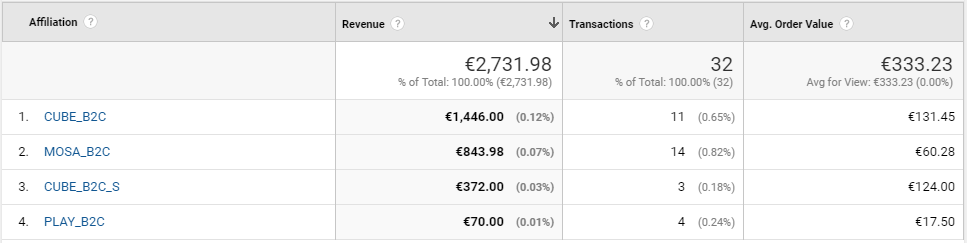
Affiliation Report Example
Measuring Sales Performance At The Product Family and Topic Level
The traditional e-commerce report offers sales performance comparison at the product level. But sometimes in order to observe the trend, it is also important to compare things at an aggregate level. The new Product Brand report is there to answer this need. Note that the brand of a ticket shop product is defined as "Product Family Type / Topic (if configured)". This report provides you possibilities to track e-commerce success of different product family and topic combinations and take actions if necessary.
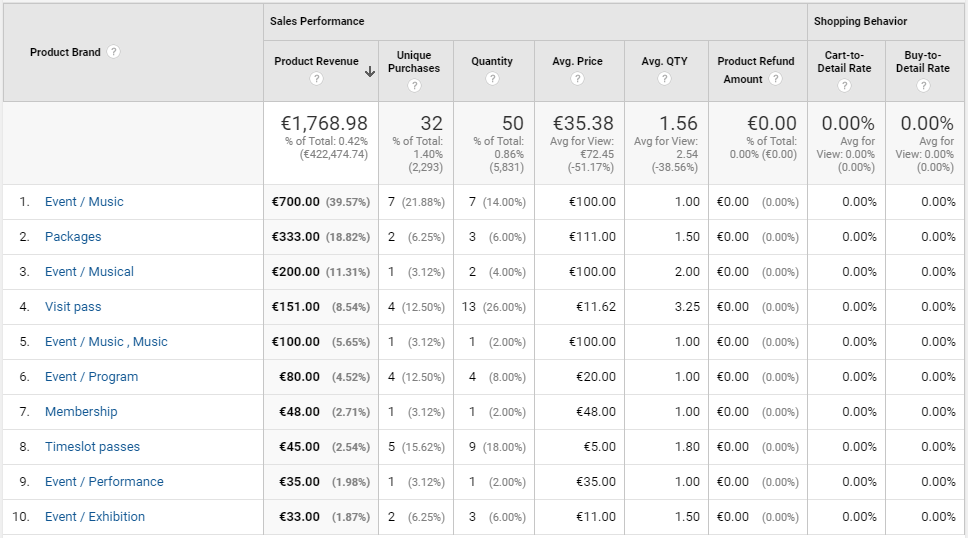
Product Brand Report Example
New DataLayer
With the support of enhanced e-commerce data tracking, more accurate and detailed transaction data are added to the DataLayer, which is pushed every time when an online user pays for an order successfully and reaches the Order Confirmation Page.
On top of existing e-commerce data, the following new information are now tracked:
- Tax - the tax (VAT) amount of the order
- Order Coupon - the promotional code used by user to get a order-level discount on the Order Summary Page
- Product Brand - information about product family type and topic of the product if a topic configured
- Product Variant - information about the cross-selling type (including up-selling, cross-selling, cross-selling via one click, hit offer, post-selling) and ID of the parent product if a product is purchased via cross-selling
- Product Coupon -information about the advantage if a purchased product has an advantage
Not only are these new data needed by Google Analytics, other 3rd-party tracking tools (integrated via GTM) can also exploit and make use of them in order to obtain deeper insights about users' e-commerce engagement behavior.
There are also some fields that exist in traditional e-commerce that are now further improved in the enhanced e-commerce tracking:
- Transaction ID - we are now using an order's File ID instead of Order ID as File ID is a more accurate reference for operations like order refund, cancellation, pay for a reservation, etc.
- Affiliation - instead of using the institution code, we are now tracking the associated organization code and point of sales code of the corresponding online ticket shop in order to help you easier compare the sales performance across multiple online ticket shops, if you have more than one organizations or online ticket shops configured.
For a full definition of the new DataLayer structure, please refer to the example below.
Contact / LogIn data
Product impression and action data
Cart and Check-out
Ticket quantity tracking for e-commerce package
We've added a new parameter at point of sale level to define the way the data layer is structured for packages before sending the data to Google Analytics.
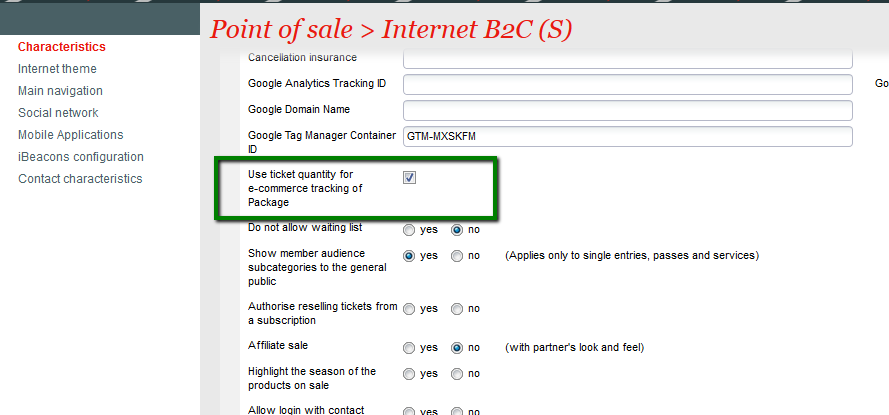
With this new parameter, package quantity is calculated based on the number of tickets in the package before sending the data to Google Analytics.
Specific tracking for the Tournament-specific Lottery Module
The tournament lottery module does not have the same tracking as our regular ticketshop. This section details the events that are pushed to the data layer for this specific module.
Tournament Lottery Specific Tracking