| Note | ||
|---|---|---|
| ||
Please note that our Enhanced E-commerce Tracking is only supported if you are using Universal Analytics tracking and Google Tag Manager. |
Context
| Excerpt | ||||||||||||
|---|---|---|---|---|---|---|---|---|---|---|---|---|
|
Solution
Following the delivery of Cart and user info tracking on Enhanced E-commerce in Whymper V3, we have continued our journey to enrich the e-commerce tracking data for our online sales platform in Bishorn V1. This time, we focus on understanding product impressions and clicks, promotion impressions and clicks and the checkout process.
| Info | ||
|---|---|---|
| ||
Applies for all internal sales channels that enables the pos-param "Enable enhanced e-commerce tracking", applies for all product families (includes Season ticket, Hospitality) The SecuTix data layer is not pushing data on the self-exchange online pages. |
Impressions and clicks
on SecuTix ticketshop pages- On the landing page :
- Clusters & sections views: push all products' impression data (including all products in the List view, even if the "Load more" button has not been clicked.)
- For the carousel or slider sections, we push all products inside the slider, no matter when user clicks on an arrow to see the other products or not. Meaning that if the product
- is in the slider, it will considered
- as an impression.)
- Product type view: push all products belonging to the current Product Type selected (e.g push all products of the EVENT tab, when user
- clicks on the VISIT tab,
- and then pushing all
Acceptance criteria
- Sending data from new actions depend on current pos-param "Enable enhanced e-commerce tracking" which applies for all internet sales channels
- Products/Promotion impression data is sent in Landing page (Section view + list product families view), Landing page calendar view and normal product list page are out of scope
- On Landing page section view, sending data also depends on scroll depth, which means only send list of products/section if user scroll the page
- VISIT tab products)
- On Landing page section view, sending data also depends on scroll depth. This means that the data will be pushed as the user scrolls the landing page.
- If a product card on
- the landing page is a Tour, we push the Tour
- id as the
- product Id.
- If a product card
- is a
- list of timeslots/
- performancse, we push its' product
- Id (Event
- Id or Visit pass
- Id).
- Data is are also sent after user click clicks on a product/a promotion, and in the product/promotion details page (page just before the shopping cart)
1. Product impression
Push product impression data to datalayer as follows :
| Code Block | ||||||
|---|---|---|---|---|---|---|
| ||||||
<script>
dataLayer.push ({
  'event':'ee-productImpression'
  'ecommerce': {
    'impressions': [{
      'id':'12345678',                  // Product ID, Tour ID. If on landing display multiple timeslots or multiple performances, push product ID of the Pass or Event multiple times.
      'name':'Romeo & Juliet',          // Product name, Tour name
      'brand':'Event / Drama',          // Product Family Type / Topic of the product (if set)
      'position':0,                     // Position of a product in a given Section (landing page) or Product type (Landing page list view or Normal view). Position of a product in a Section can be different if user change the day view (Today, Tomorrow, After,...)
      'list': 'Hot topic'               // On Landing page content return Section name, on Landing page list view return Product type name (for a Product type products can be grouped by topic (sub-grouping), please set position and list by Topic name in this case
     },
     {
      'id':'ABC124',
      'name':'Product Name',
      'brand':'Product Brand',
      'position':1,
      'list': 'Hot topic'
     }]
   }
});
</script> |
2. Promotion impression (Advantage)
Push Promotion impression data to datalayer on the same pages and sections mentionned above :
| Code Block | ||||||
|---|---|---|---|---|---|---|
| ||||||
<script>
dataLayer.push ({
  'event':'ee-promoImpression'
  'ecommerce':{
    'promoView':{
      'promotions':[{
      'id':'177664',                            // Advantage ID
      'name':'Member Exclusive',                // Advantage name
      'creative':'Only for member',             // Advantage description
      'position':1                              // Position of a product in a given Section (landing page) or Product type (Landing page list view or Normal view)
     }]
   }
  }
});
</script> |
3. Product details impression
Data pushed when :
- A product is clicked (accessing the product details page)
- For the calculated season tickets, it is at the ticket selection page
- For the Hospitality product family, it is at the hospitality selection page
- At the ticket selection page.
| Code Block | ||||||
|---|---|---|---|---|---|---|
| ||||||
<script>
dataLayer.push({
  'event':'ee-productView'
  'ecommerce': {
    'detail': {
        'products': [{
        'id':'ABC123',						// Product ID
        'name':'Product Name',',				// Product name
        'brand':'Product Brand',			// Product Family Type / Topic of the product (if set)
       }]
     }
   }
});
</script> |
4. Product click
Push Product details' data when user clicks a product
| Code Block | ||||||
|---|---|---|---|---|---|---|
| ||||||
<script> dataLayer.push({ ({ 'event':'ee-productClick' 'ecommerce': { 'click': { 'eventactionField':'ee-productClick' { 'ecommercelist': { 'Product list name' }, 'clickproducts': [{ 'actionField': { 'id':'ABC123', // Product ID 'listname':'Product Name'Product list, // Product name' }, 'productsbrand': [{ 'id':'ABC123','Product Brand', // Product Family Type / Topic of the product (if set) 'nameposition':'Product Name', 'brand':'Product Brand', 'position':00 // Position of a product in a given Section (landing page) or Product type (Landing page list view or Normal view) }] } } }); </script> |
5. Promotion click
Push Product details' data when user clicks a product
| Code Block | ||||||
|---|---|---|---|---|---|---|
| ||||||
<script>
dataLayer.push ({
  'event':'ee-promoClick',
  'ecommerce':{
    'promoClick':{
      'promotions':[{
        'id':'Promo ID',						// Advantage ID
        'name':'Promo name',					// Advantage name
        'creative':'Creative name',				// Advantage description
        'nameposition':'Promo name',
        'creative':'Creative name',
        'position':PositionPosition						// Position of a product in a given Section (landing page) or Product type (Landing page list view or Normal view)
        }]
      }
    }
});
</script> |
Checkout
process and the SecuTix data layerAcceptance criteria
- Data is sent to datalayer in check out process with 2 steps: Delivery + Order summary
- It also depends on current pos-param "Enable enhanced e-commerce tracking" which applies for all internet sales channels
process
- Data are sent to datalayer in check out process with 2 steps: Delivery and Order summary(after the payment page)
| Info | ||
|---|---|---|
| ||
Please note that the payment page cannot push any data in the data layer, as this is a secure page and pushing data externally in a secure page is forbidden by the PCI certification. |
1. Delivery step
When user choose a delivery mode and click on Continue
| Code Block | ||||||
|---|---|---|---|---|---|---|
| ||||||
<script>
	dataLayer.push({
		'event': 'ee-checkout',
			'ecommerce': {
				'checkout': {
					'actionField': {
						'step': 1, 										//check out step, (1: Delivery, 2: Summary)
						'id': '15284', 									//shipment Mode ID
						'shippingMode': 'E-ticket', 					// shipment mode name
						'shipping': 8 									//shipment fee
						},
					'products': [{ 										// List of productFieldObjects inside the order.
						'name': 'Triblend Android T-Shirt', 			// Product Name (mandatory).
						'id': '12345', 									// Product Id (mandatory).
						'price': '15.25', 								// Unit Price (mandatory) (same as the basic e-commerce tag).
						'brand': 'Visit Pass / Exhibition', 			// Product Family Type / Topic of the product (if set)
						'category': 'Cat A / Normal', 					// seat category / tarrif type
						'variant': 'Cross-sell 1-click / 1234567', 		// cross selling type / parent product id (if purchased via cross-selling)
						'quantity': 1, 									// same as the basic e-commerce tag
						'coupon': 'PartnerCUBE' 						// advantage name / advantage id
						}]
					}
				}
});
</script> |
2. Order summary step
When user input a voucher, select a payment method, then click on Continue to Payment
| Code Block | ||||||
|---|---|---|---|---|---|---|
| ||||||
<script>
dataLayer.push({
	'event': 'ee-checkout',
		'ecommerce':{
			'checkout':{
				'actionField':{
					'step': 2, 											//check out step, (1: Delivery, 2: Summary)
					'option': 'VISA', 									//selected payment method name
					'id': '1000463', 									//File ID
					'shipmentID': '1111111', 							// shipment ID, get from Delivery step
					'shippingMode': 'E-ticket', 						// shipment mode name
					'shipping': 8, 										//shipment fee
					'payment fee': 4, 									//payment overhead fee
					'revenue': 35, 										//total amount to pay
					'coupon': 'PROMO' 									//promotional code or voucher code
					},
				'products': [{ 											// List of productFieldObjects inside the order.
					'name': 'Triblend Android T-Shirt', 				// Product Name (mandatory).
					'id': '12345', 										// Product Id (mandatory).
					'price': '15.25', 									// Unit Price (mandatory) (same as the basic e-commerce tag).
					'brand': 'Visit Pass / Exhibition', 				// Product Family Type / Topic of the product (if set)
					'category': 'Cat A / Normal', 						// seat category / tarrif type
					'variant': 'Cross-sell 1-click / 1234567', 			// cross selling type / parent product id (if purchased via cross-selling)
					'quantity': 1, 										// same as the basic e-commerce tag
					'coupon': 'PartnerCUBE' 							// advantage name / advantage id
					}]
				}
			}
});
</script> |
Getting started
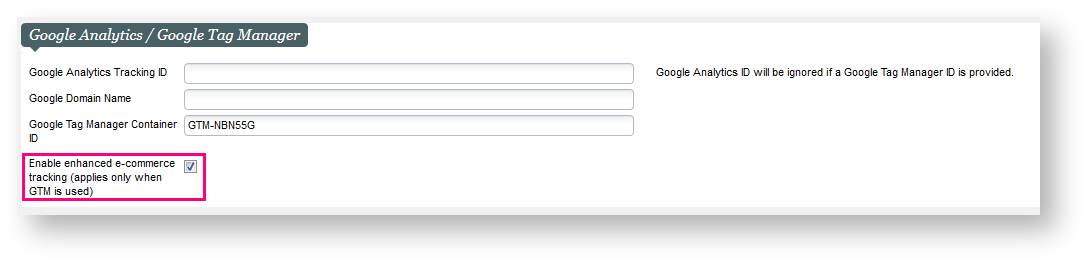
To activate the enhanced e-commerce tracking go to the corresponding sales channel >> point of sales >> in the Google anaytics sections make sure to check the "Enable enhanced e-commerce" option.
You may need to do some setup on your Google Analytics account to make the best out of the Enhancer E-commerce Tracking. In order to best help you on this process, our service team offer you a service to provide an end-to-end activation solution.