...
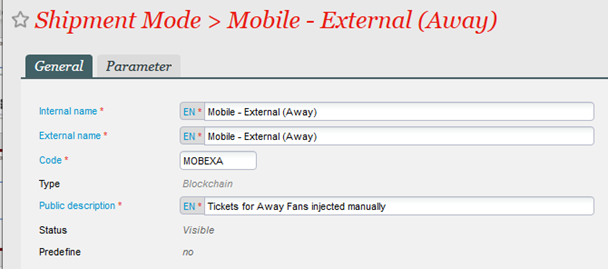
- Create a secondary TIXNGO Shipment method that will prevent the automatic injection of the Tickets to TIXNGO but will allow the barcodes to be generated. This should be a new Shipment Mode called “Mobile – External (Away)” of the type “Blockchain” and allocate to the back office sales channel.

- Process the Away Ticket sales within the S-360 environment to generate the barcodes/tickets for the away team ensuring the shipment mode selected is the “Mobile – External (Away)” shipment mode created in Step 1. We'd suggest making multiple files for the sale instead of 1 giant order as it will make amending post-match for reconciliation purposes much easier. The files could be against an "Away Ticket" contact or the name of the Away Club.
We would recommend that all tickets for the away team are sold in a specific “Away Team” seat category or held within a specific contingent. This will be used in a later step to aid with ticket design.
Note, any setup specifically for Access Control should be completed prior to starting the sales process. - Following the completion of all orders, you should provide details of the seats available to the Away team to sell including details of the Block, Row and Seat so they can build the seating map within their ticketing system.
- The data in step 3 should be accompanied by an excel spreadsheet that includes the seating information, barcode or ticket ID relating to the seat along with space for them to enter the first name, last name and email address of the supporter. We can also add optional fields to add such as supporter number if they wish to display this on the ticket.
An example of the exported data to share with the away team is below. Note, First name, Last name, email address and supporter number would all be blank at the time of sharing with the club.
INSERT EXAMPLE OF THE TICKETING SALES DOCAn example of the file structure to provide to the away team is below.View file name Using TIXNGO for Away Supporters traveling to Client stadium.xlsx height 250 - The away team sell the tickets in their usual format and provide you with an updated copy of the extracted data which includes the original information shared (Ticket ID, Barcode, Turnstile, Area, Block, Row and Seat Number) along with the completed information of ticket type, first name, last name, email address and supporter number of the ticket holder.
Note. It is these details that will be used to distribute the TIXNGO Tickets to the ticket holder and so the file should only be provided back to the Home Team once all tickets have been sold. - Once the data has been returned from the Away Team, this information needs to be added into a TIXNGO CSV ticket upload document and manipulated to add in the items for ticket information and ticket design. This hybrid file is a combination of the exported list of tickets (and barcodes) along with the sales information provided back by the away team. This file will include barcode, ticket holder email address & name, seat details (to show on the ticket), any imagery and transfer rules.
- This file should include all the following details:
- Ticket ID (From Secutix)
- Barcode (From Secutix) – This must match the barcode generated from Secutix otherwise access control could fail.
- Seating Details (From Secutix)
- Turnstile Information
- Event Information such as name, ID, date and time.
- Ticket Imagery (event image, sponsor, seat map, prohibited items plus icon if required)
- Ticket Colours (Banners and Secure Colours)
- Ticket Holder Email (From other team)
- Ticket Holder First and Last Name (From other team)
- Transfer Rules
- An example injection file format can be found below:
View file name Base TIXNGO Ticket Injection File.csv height 250 - Follow the standard CSV Injection process described on the link below: https://confluence.secutix.com/display/TIXNGO/CSV+Injection
NOTE. It’s worth injecting a test file initially to confirm event information, file formatting and ticket design. - Once tickets have been injected to TIXNGO, fans will start to receive their tickets via the app.
...
Using TIXNGO for YOUR Fans traveling to AWAY Stadium
Option 1
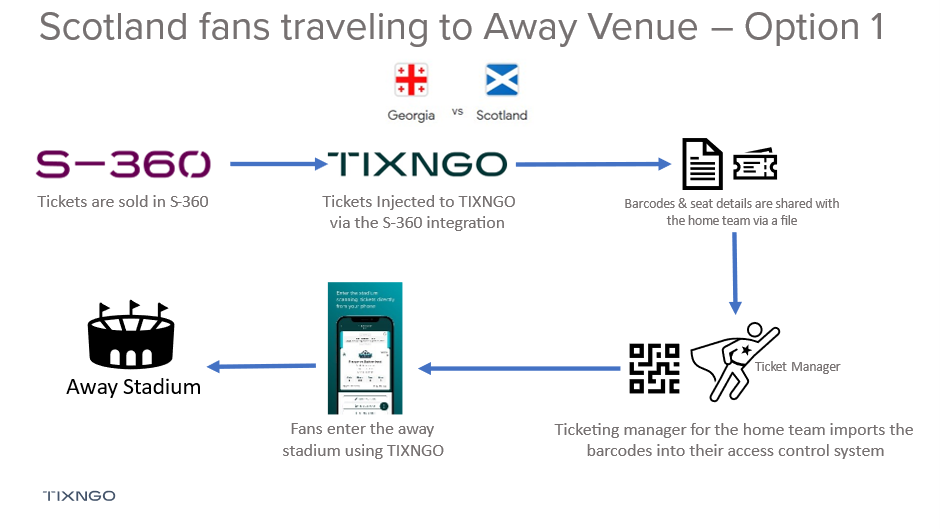
- Configure the seating layout of the away stadium within the S-360 platform and build the match with each of the different categories and prices required.
- Sell the away tickets directly to the your fans within S-360 ensuring that users are allocated seats according to the plans shared by the opposition team. The TIXNGO Shipment mode should be used for all tickets purchased to allow them to be injected to your TIXNGO Branded Wallet.
- Tickets are injected into TIXNGO using the standard S-360 to TIXNGO interface. A separate template could be used for away matches compared to your home matches to alter the ticket details, imagery, and colours specifically for the away tickets to ensure they are easily identifiable at the venue.
- Run a list of tickets report for the match ensuring all tickets that will be distributed via TIXNGO are included. The report should include the ticket barcode, ticket number, seating details (Area, Block, Row, Seat) and ticket beneficiary.
- Once the report has ran, export this data to Excel and share with the opposition ticketing manager.
- The ticket manager of the opposition (home team) can import the barcodes into their access control system to ensure the TIXNGO tickets can gain entry successfully.
- Tickets are delivered to your fans who have travelled to the away venue via your TIXNGO Branded Wallet.
- Fans enter the venue using their activated tickets (Based on time or proximity to the venue).
Note
To use this method, an agreement would need to be in place with the away club as they will need to import external barcodes into their access control system.
Be careful if opening exported data in Excel as the format of barcode numbers can be altered by cell formatting which would cause their to be a difference between the barcode in TIXNGO and the barcode imported to Access Control.
Option 2
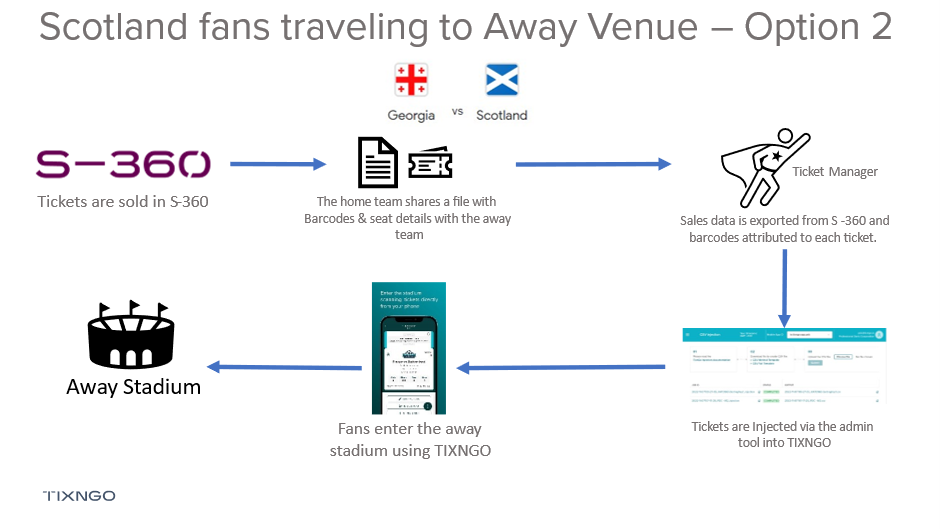
- Configure the seating layout of the away stadium within the S-360 platform and build the match with each of the different categories and prices required.
- From the Home Team (opposition) you'll need to request a file containing the ticket information ready for your injection. This should include (as a minimum) the following details:
- Ticket Number
- Barcode
- Entrance
- Stand
- Area or Block
- Row
- Seat

- Sell the away tickets directly to the your fans within S-360 ensuring that users are allocated seats according to the plans shared by the opposition team. A secondary TIXNGO Shipment mode should be used for all tickets purchased to ensure they aren't injected to TIXNGO via the usual S-360 to TIXNGO interface.
- Once all tickets have been sold for the match, you'll need to run a "list of seats" report that includes the following columns. Once ran, export the results as this will be used to match to the barcodes provided by the opposition in the first file.
- Area
- Block
- Row
- Seat
- File Number
- Cultural Contact Number
- Cultural Contact Email
- Cultural Contact Name
- Tariff

Note. You may need to delete rows relating to unsold seats if you didn't sell out the allocation.
- Combine the exported seat details with the ticket file provided by the opposition club to create a single file that links the correct barcode, seat and contact who will need to receive the ticket.
- Within your new file, separate the cultural contact name into a first name and last name field.

- Next we need to prepare our file in the correct format for importing to TIXNGO ensuring we include all mandatory fields. The most widely used fields for this purpose are below:
- activationParameters.method
- activationParameters.time
- image
- event.id
- event.group.image
- event.address.site
- event.address.line1
- event.address.city
- event.address.countryCode
- event.address.zip
- event.website
- event.name
- event.startTime
- event.metadata
- purchaseDetails.price
- purchaseDetails.currency
- purchaseDetails.date
- purchaseDetails.priceCategory
- ticketDetails.main
- ticketDetails.extra
- ticketDetails.hidden
- purchaseDetails.taxationNumber
- security.barcode
- spectatorDetails.email
- spectatorDetails.firstName
- spectatorDetails.lastName
- ticketId
- mobileAppId
- transferRules.allowTransfer
- transferRules.allowTransferAfterActivation
- transferRules.maxNumberOfTransferPerTicketInGroupId
- design.id
- design.backgroundColor
An example finished file can be found further down this document.
Note that "ticketDetails.main" can be tricky to get into the correct format as it includes the seating details within a single field plus the required formatting. An example of the format is below:
[{"key": "Entrance", "value": "Gate 7"},{"key": "Stand", "value": "OESTE"},{"key": "Block", "value": "S4"},{"key": "Row", "value": "B"},{"key": "Seat", "value": "1},{"key": "Tariff", "value": "Away Supporters"},{"key": "Competition", "value": "International Friendly"}] One method of producing the correct format is by splitting the elements into separate columns and using a concatenation, for example, add in columns in-between the variable elements and then in your "ticketDetails.main" field, use a formula such as =CONCATENATE(S2;T2;U2;V2;W2;X2;Y2;Z2;AA2;AB2;AC2). Once you've done this, copy the "ticketDetails.main" field that includes the formula and paste the values, this will leave you with the required formatting. The same approach can be taken for "ticketDetails.extra" and "ticketDetails.hidden". For Example:
Entrance Stand Area Row Column1 Seat Column2 ticketDetails.main [{"key": "Entrance", "value": " Gate 7 "},{"key": "Stand", "value": " OESTE "},{"key": "Block", "value": " S4 "},{"key": "Row", "value": " B "},{"key": "Seat", "value": " 1 },{"key": "Tariff", "value": "Away Supporters"},{"key": "Competition", "value": "International Friendly"}] =CONCATENATE(S2;T2;U2;V2;W2;X2;Y2;Z2;AA2;AB2;AC2) - Your file format should match that described in the TIXNGO CSV Injection documentation: CSV Injection. Once you're happy with the formatting, save the file as a semi colon delimited CSV file. An example file can be found below:
View file name GFA-SeatDetails-S3-S42 - Event Creation.csv height 250 - Go to the TIXNGO Back Office and navigate to CSV Injection
- Choose the file to upload and then press submit.

- After a few minutes, refresh the page and check if the import was successful or if it failed. This is shown in the status field next to the file name.

- Check the import status by downloading the output file, if it failed, this file will detail the reason.
- If required, amend your file, resave and reupload. If doing this, be sure to edit in a text editor (NOT EXCEL) to avoid the barcodes being malformed.
- Choose the file to upload and then press submit.
- Once the file has imported successfully, tickets will be available in TIXNGO ready for the fans to travel to the away venue.
NOTES
It’s worth injecting a test file initially to confirm event information, file formatting and ticket design.
Be careful if opening exported data in Excel as the format of barcode numbers can be altered by cell formatting which would cause their to be a difference between the imported barcode in TIXNGO and the barcode in Access Control.